Snap Instructions
We know you’re eager to start flying, but please read the instructions and safety information carefully first.

[expand title=”Before You Fly” tag = “h1”]
Responsible and Safe Use
- Never fly directly above people.
- While Snap has safeguards for protecting people from prop injury, it still poses risks to fingers, especially for children. Never intentionally fly into anyone.
- Not everyone likes flying robots. Be considerate of people’s privacy and peace of mind when flying in public spaces. While we know it’s tempting, don’t use Snap to peer in people’s windows, breach top secret military bases, and go other places it isn’t welcome.
- Snap is a powerful flying robot. Don’t fly drunk or intoxicated. Seriously.
- It is illegal to fly over 400 ft high or within 5 miles from airports in the United States. Find out what your local regulations are concerning drones and play by the rules. Don’t use Snap for anything illegal.
- Snap is built to be robust, but it still has some sensitive spots. If sand or dust gets into the wrong places, bad things can happen.
- Do not use Snap in bad weather (rain, strong winds, snow) or when you can’t see it well (night or dense fog).
- Snap can have a hard time maintaining position or a link with the controller in places with strong magnetic fields, radio waves or strong radiation. Avoid using Snap in an environment with too many Wi-Fi® networks or excessive wireless interference.
- Keep Snap clear of high voltage wires, trees, buildings or any other potentially dangerous area. Consider your own life first before going on any rescue missions.
Charging the battery
The battery ships half charged. It’s very important to note that batteries should be stored in a charged state to prevent damage. Charging the battery takes about 1 hour for a fully depleted battery. Here’s how to do it:
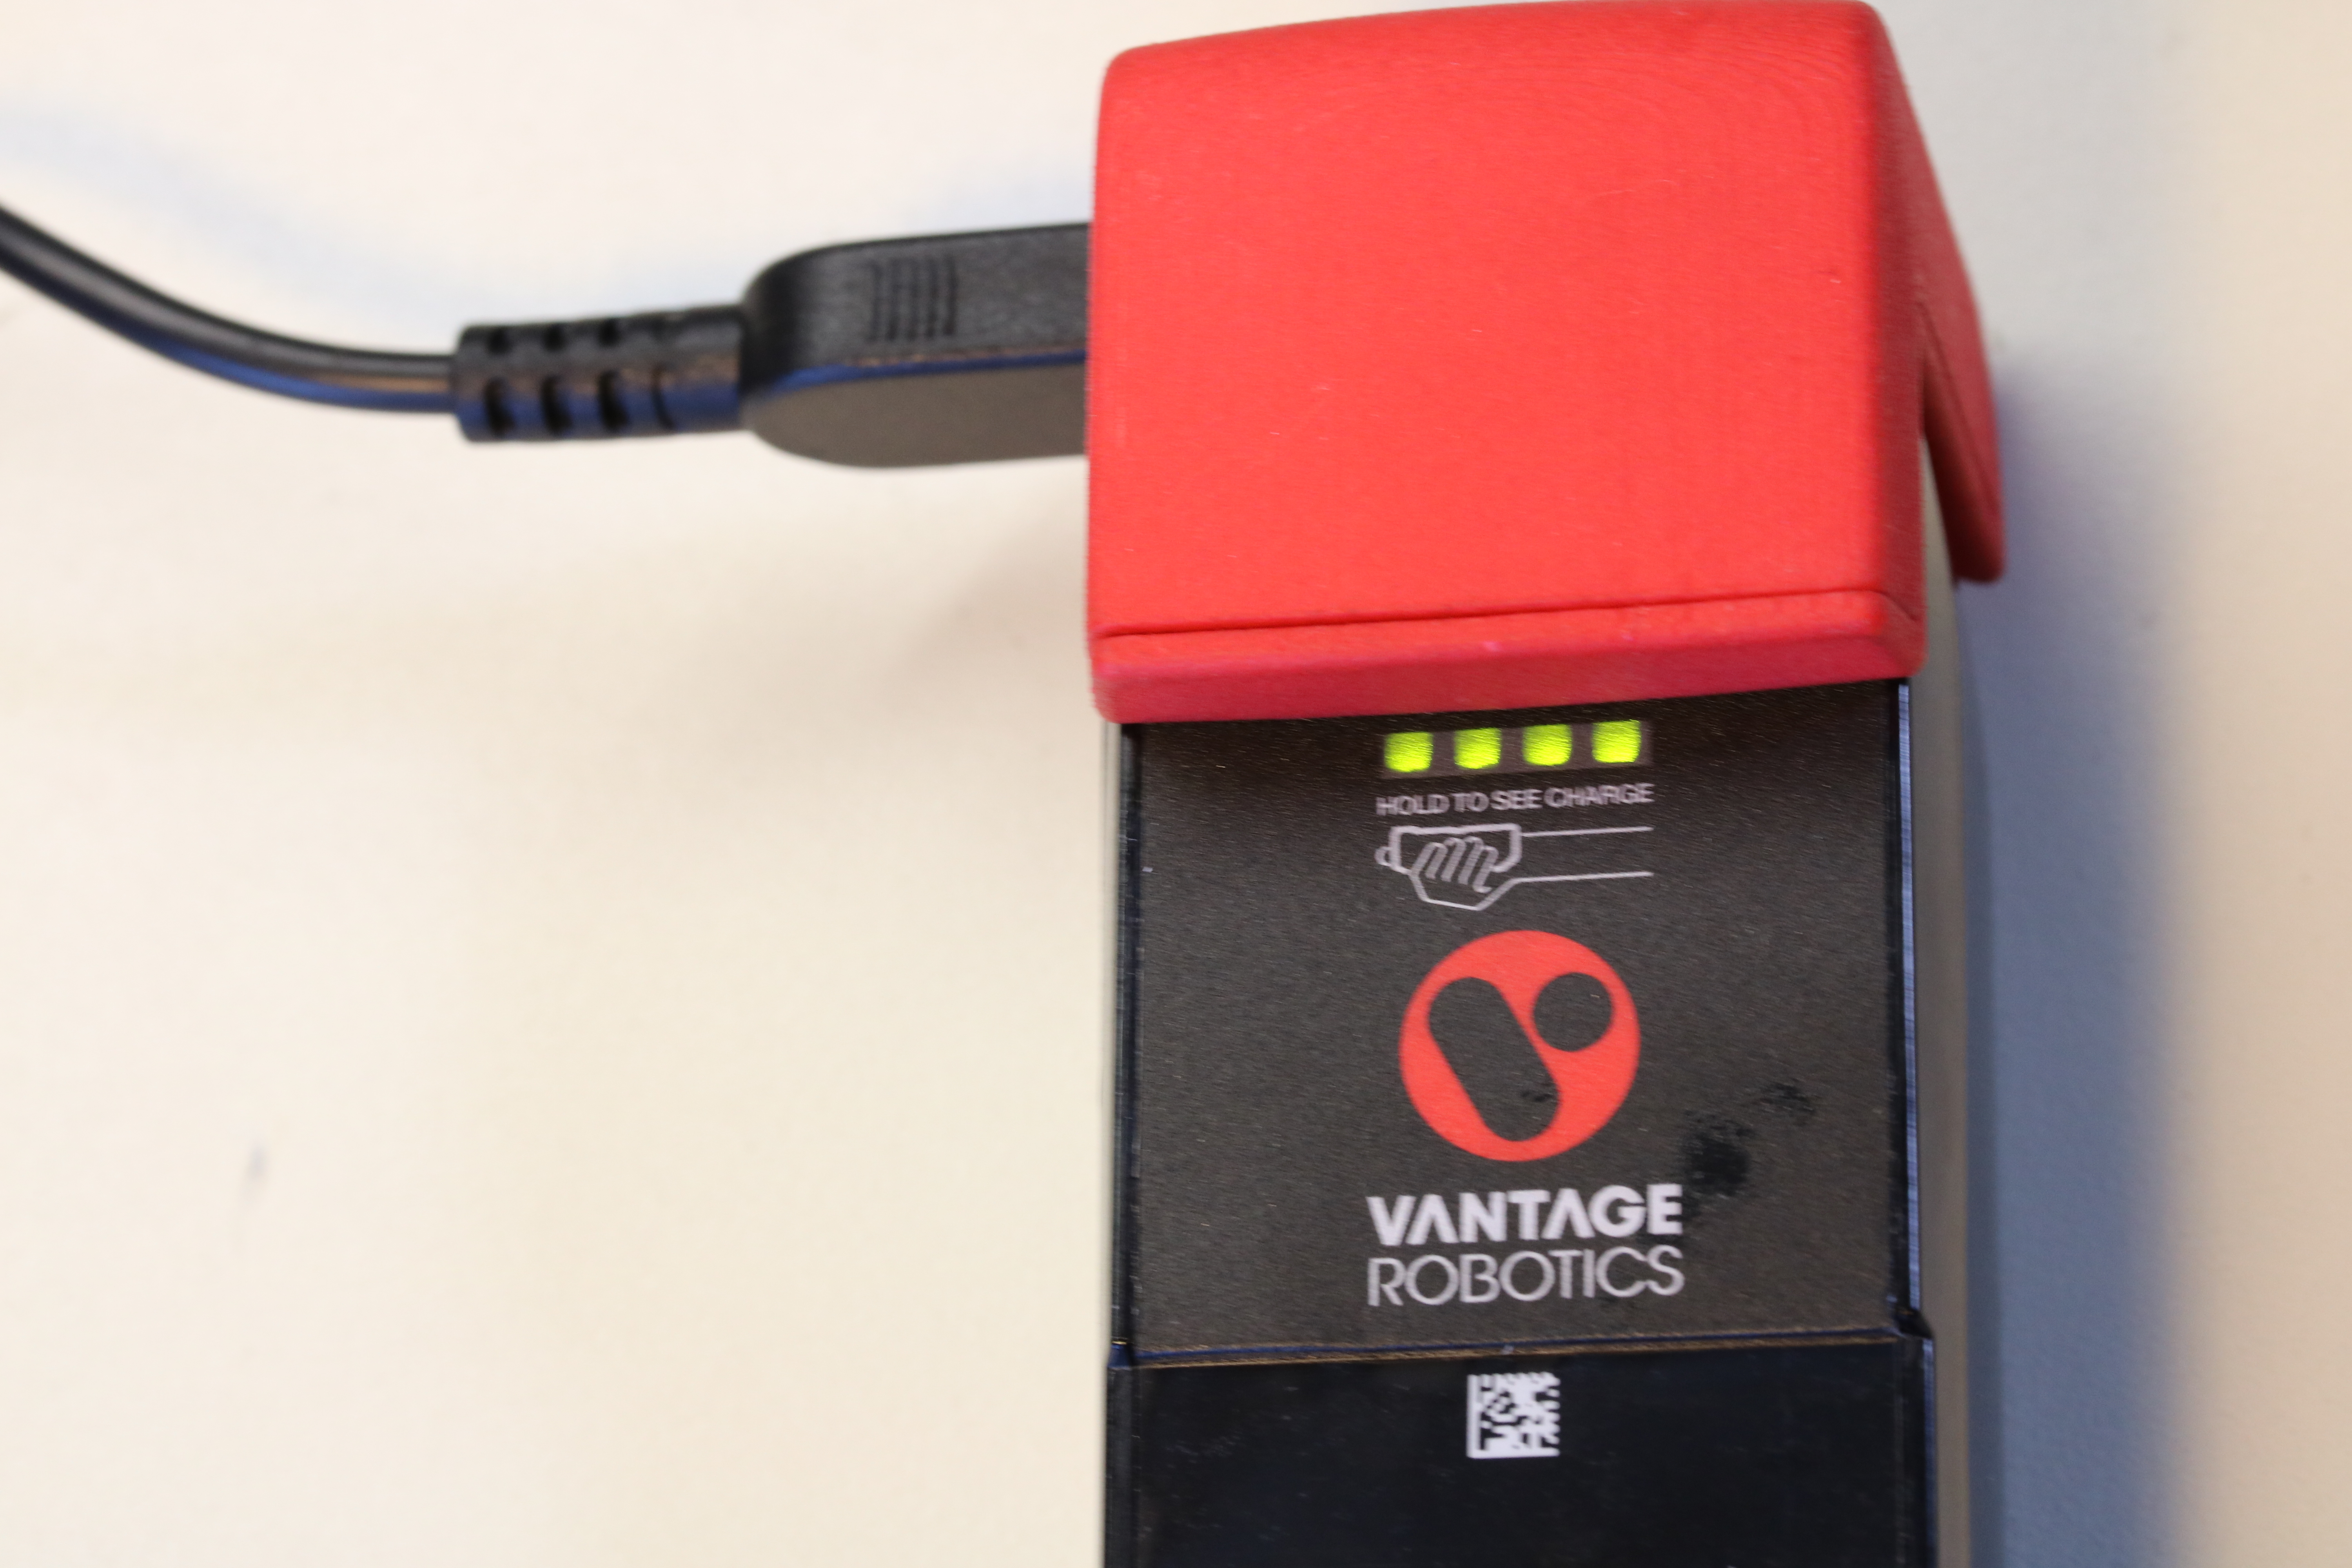
- Assemble the charger by plugging the black AC/DC brick into the red battery connector.
- Plug in the charger into the wall and snap the red battery connector onto the battery.
- The battery lights will blink slowly as its charges. The number of lights illuminated indicates the current charge state.

- When the battery is fully charged, all four lights will go out.
- You can confirm the charge state by grasping the battery, which causes the charge indicator lights to illuminate.
Getting Ready for Your First Flight
Take a few moments to familiarize yourself with the interface before getting airborne. 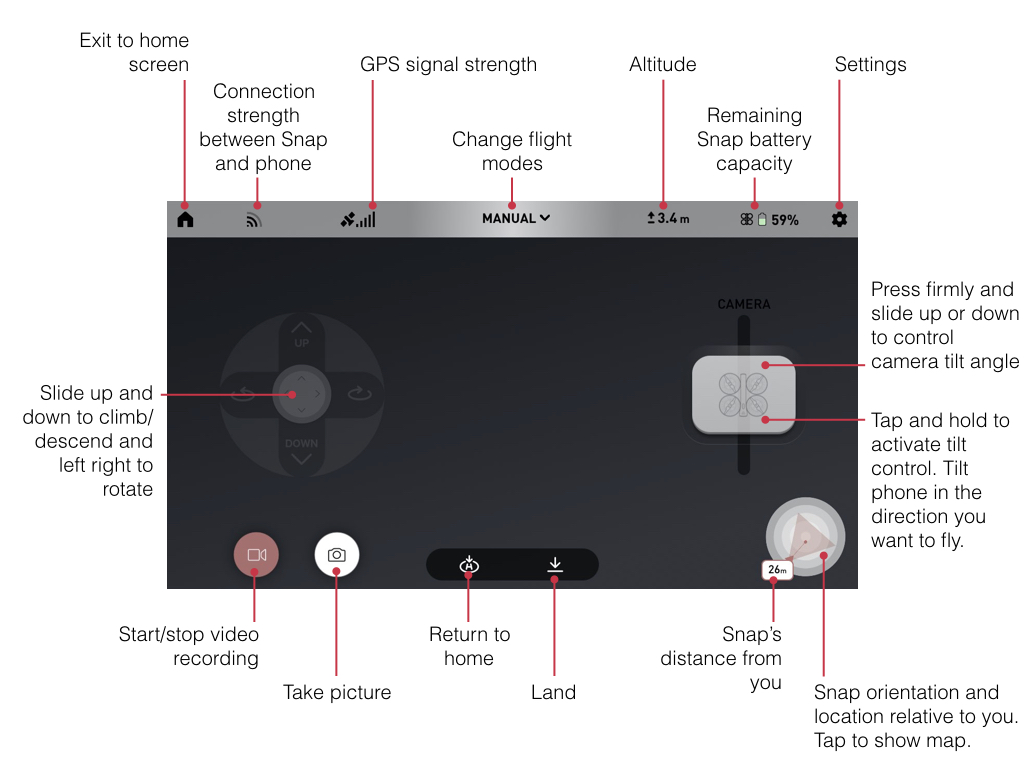
Your First Flight
Here’s the bare minimum for getting into the air and back down safely.
Your first flight should be outdoors in an open and uncrowded area. Note that Snap’s default settings are for fairly slow flight and flight controls with low sensitivity. Once you feel comfortable, you can increase flight speed and controller sensitivity in the flight settings menu.
Get Connected
- Connect Snap to the rotor set and battery. It should make a single beep followed a startup tune. The gimbal will go through a calibration routine. This calibration routine completes fastest if Snap is motionless.
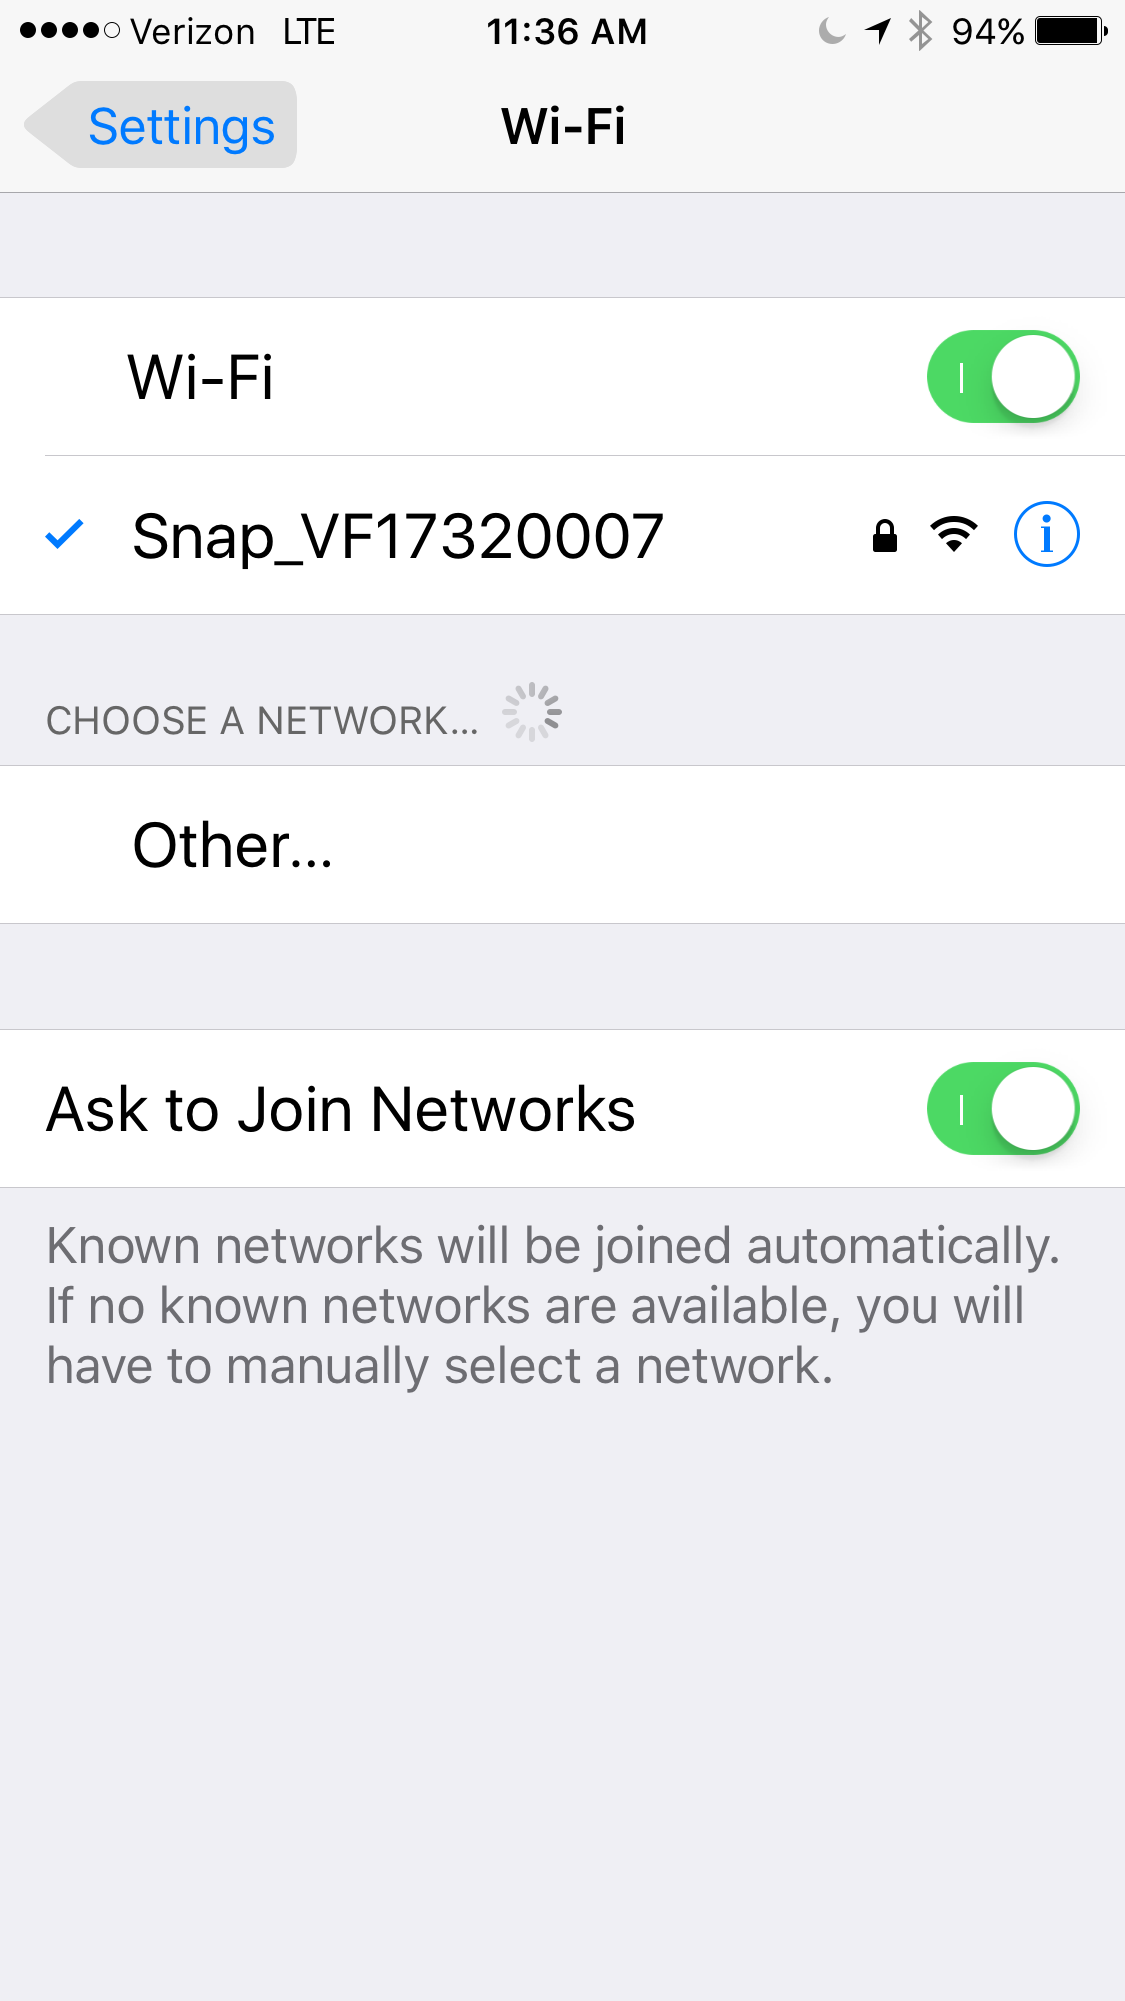
- Connecting phone to Snap:
- Go to Settings in iPhone
- Select Wifi
- Select “Snap_XXXX”, where “XXXX” is the serial number for your device. This can take 30 seconds or more to appear.
- The password is 12345678
Pre-flight
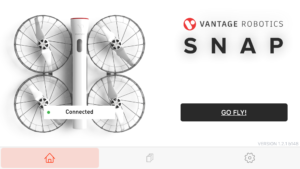
- Open the “Snap” app.
- The button on the right side should say “GO FLY”. Tap it.
- Go through a few preflight checks:

- Check propellers to make sure there are no cracks or damage.
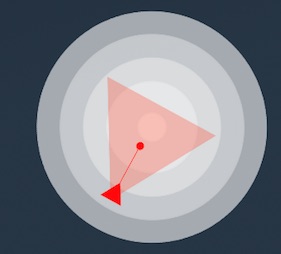
- Confirm that arrow icon in lower right points in the same direction as Snap +/- 15 degrees. Gently wiggle Snap and the phone side to side to calibrate the magnetometer if it doesn’t.
- Wait for a full GPS lock. This is the indicator in the upper left next to the signal strength icon. This requires being outside with a clear view of the sky and may take 60 seconds or more to get a fix in a new location.

Getting into the air
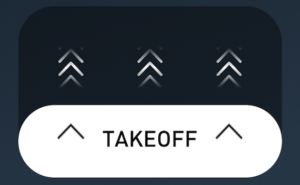
- Place Snap on flat ground with props clear of obstructions and slide the takeoff button upwards. You can take off from your hand in a subsequent flight.
- Snap will climb smoothly to 1.5 m above the ground and maintain altitude and position.
Flying
You are controlling a powerful flying robot. Take it slow to start. Keep Snap close to you and close to the ground.
- Tap and hold the Tilt Control switch on the right to move Snap laterally. Tilt your phone in the direction you want Snap to fly.
- Slide the left stick up and down to control altitude. Snap will maintain altitude after you take your finger off the stick.
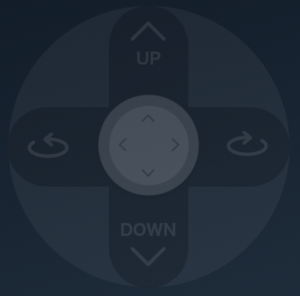 Slide the left stick side to side to control Snap’s rotation. Lateral control will remain relative to you even as Snap rotates. Experienced pilots can disable this by turning off “Smart Yaw” from the Controller tab of the settings.
Getting back down
The simplest way to get Snap safely back to terra firma is to use the “Land” button. Here’s how:
- Fly Snap over a safe landing spot.
- Press the land button

- Snap will slowly come down and the props will shut off automatically. You can steer Snap laterally as it lands to fine tune the landing location.
Transferring Video/Pictures
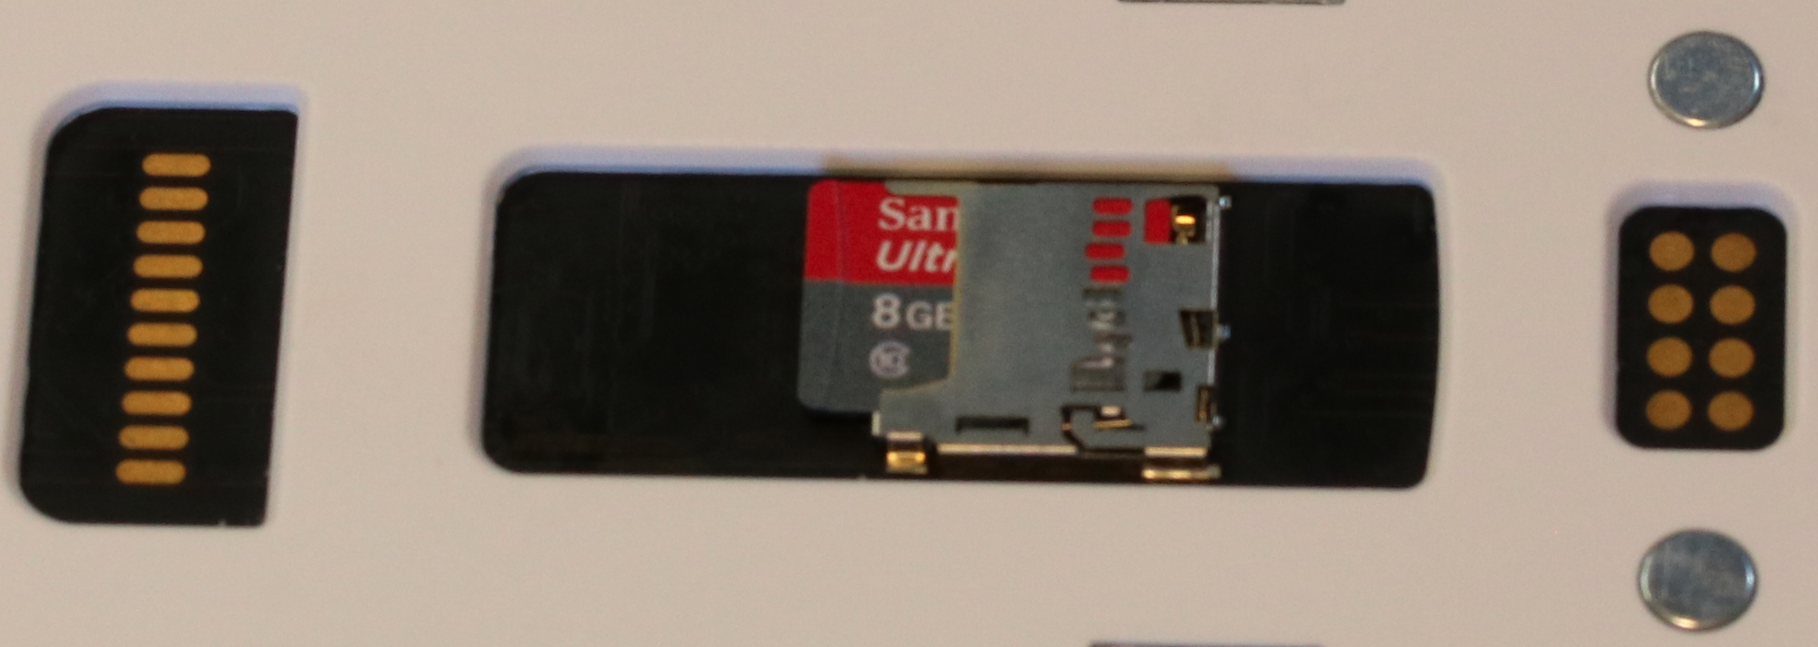
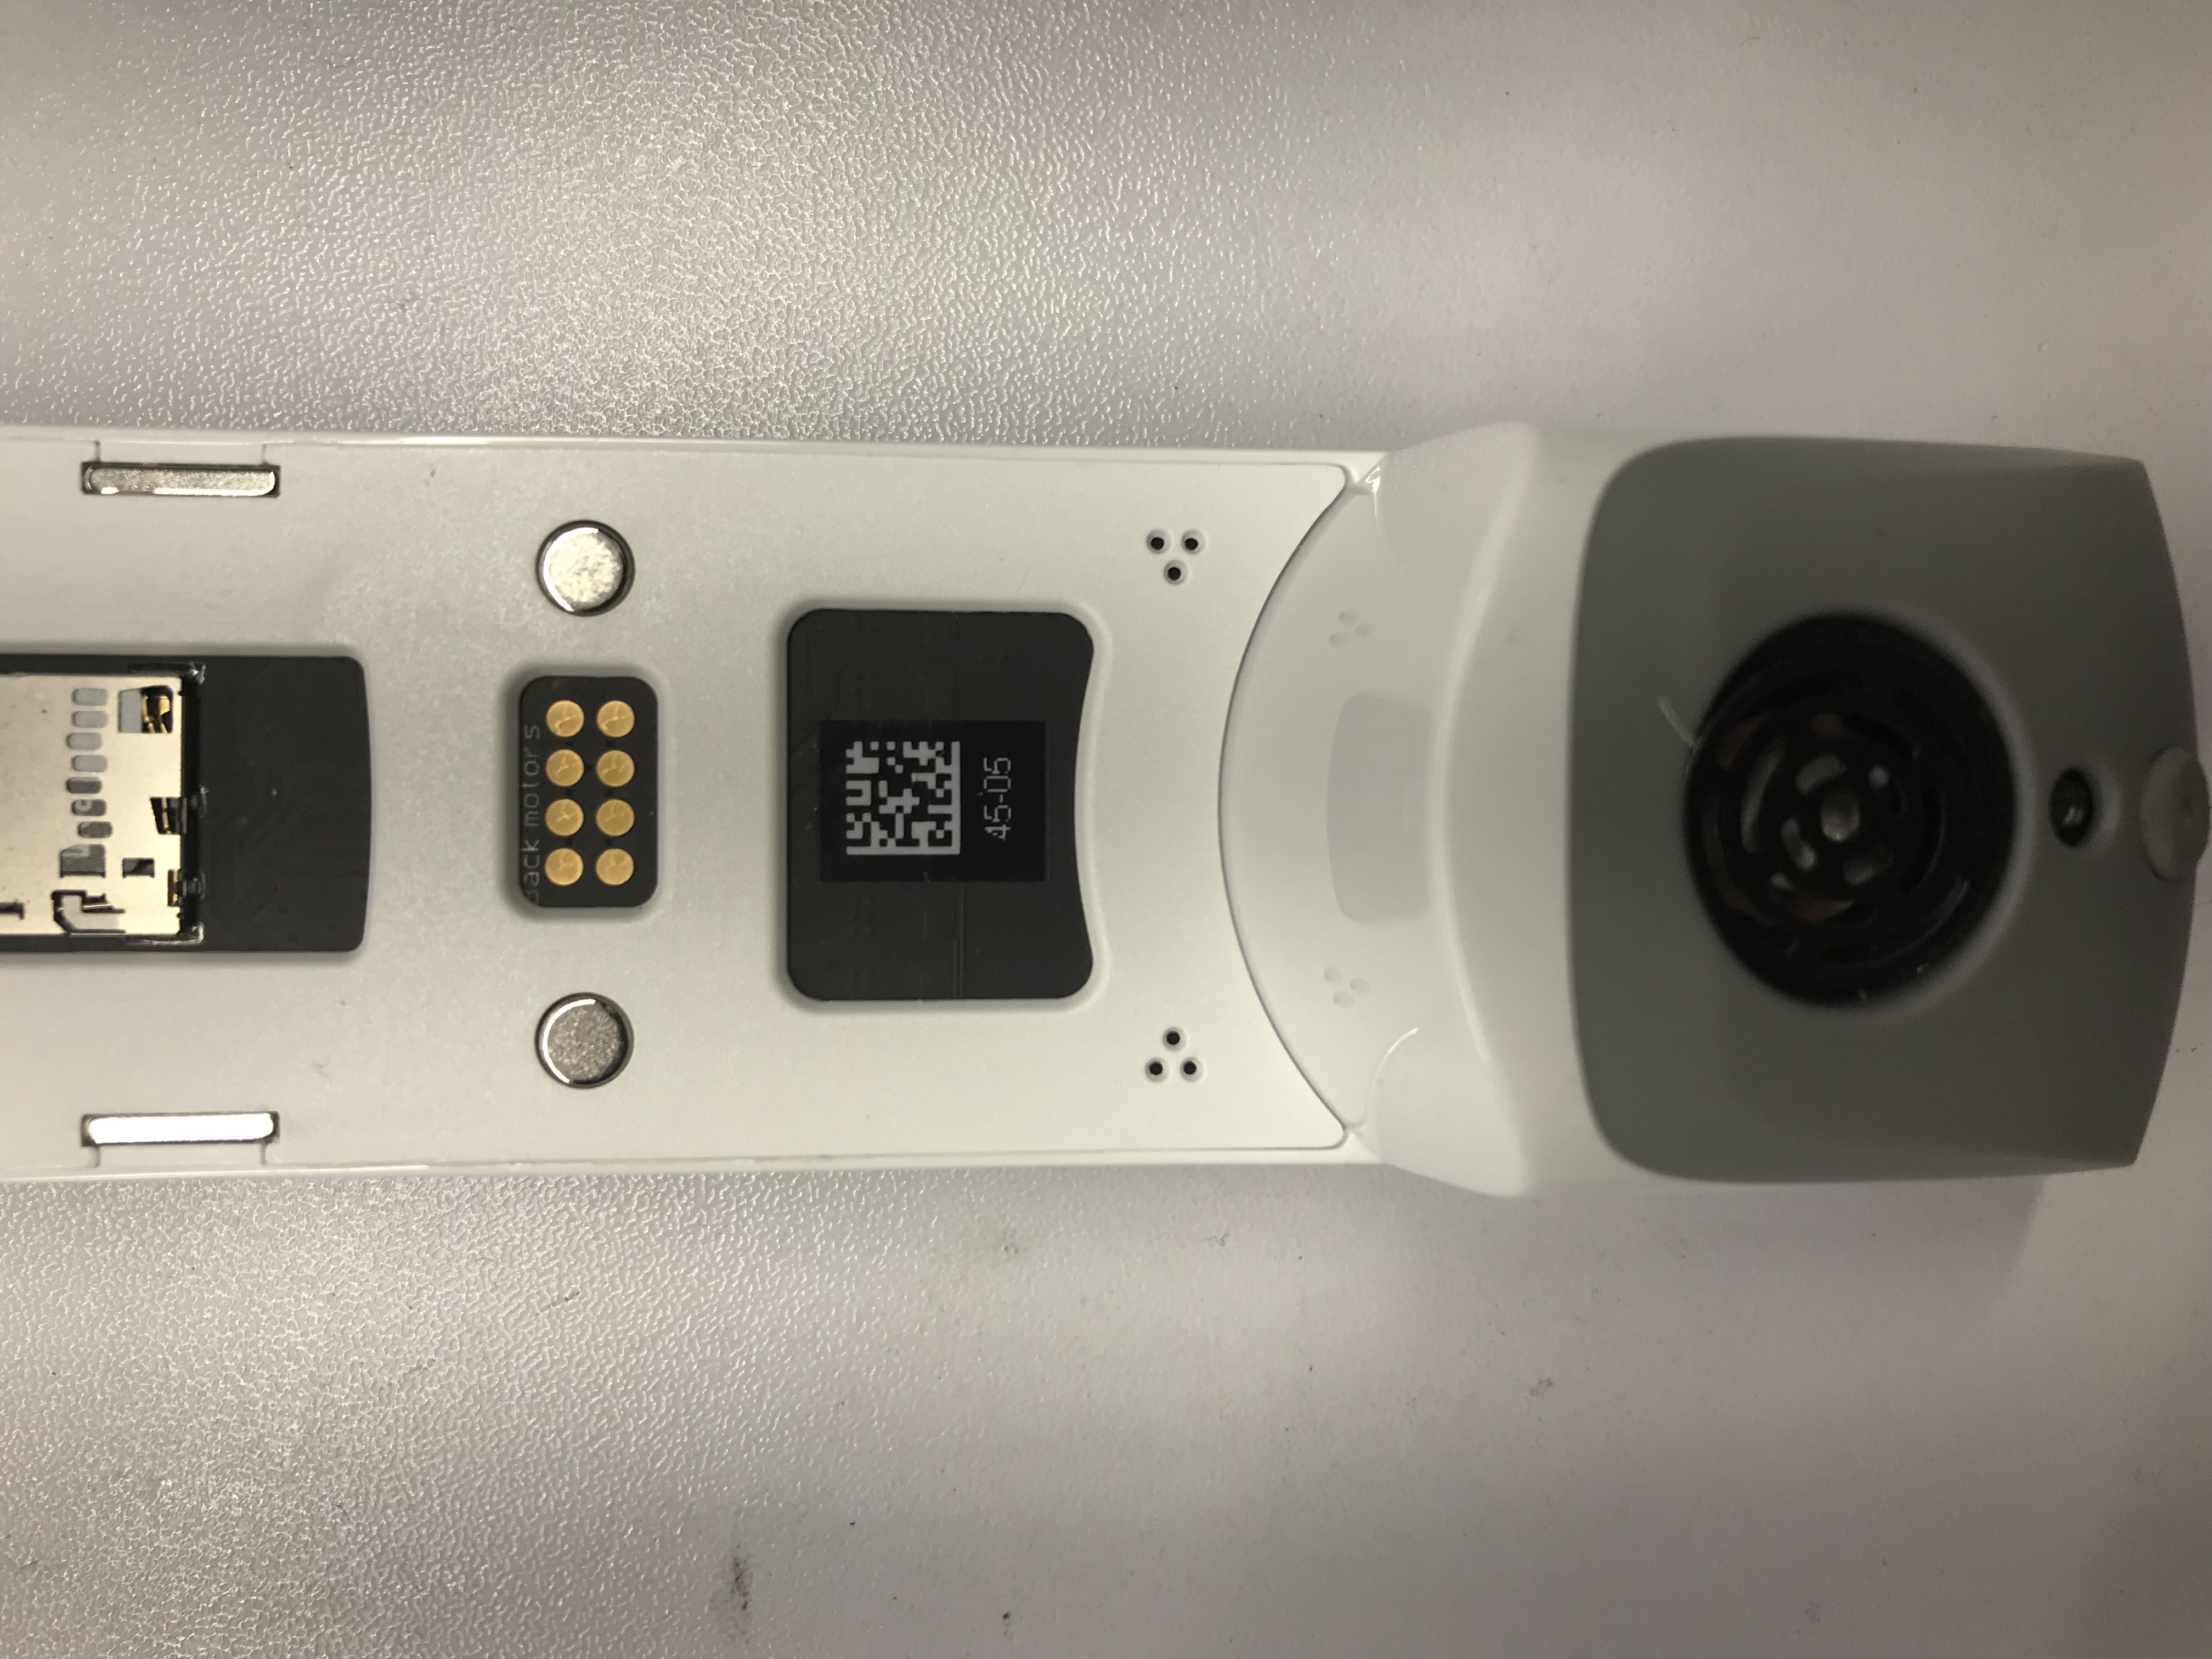
Take out Micro-SD card from slot on the underside of the fuselage and transfer to computer using the MicroSD card reader. If you are using a Mac, make sure to empty the trash after deleting videos on the SD card. Otherwise your videos will remain undeleted in a hidden folder and Snap will complain that your SD card is full (which it will be, even though it appears otherwise).
Storage and Travel
You can store Snap with the battery attached or removed. If you leave it attached, Snap will turn off automatically after four minutes. You will need to briefly detach and reattach the battery to turn Snap back on (auto turn on coming soon!). Do NOT store the battery uncharged.
Snap is fairly tough and can be placed loosely in bags without protective packaging. Avoid stuffing Snap too aggressively, as this has the potential to damage the gimbal or rotor set. Use the included sock for the body to keep the gimbal free from dirt and other nasty bits floating around in your bag.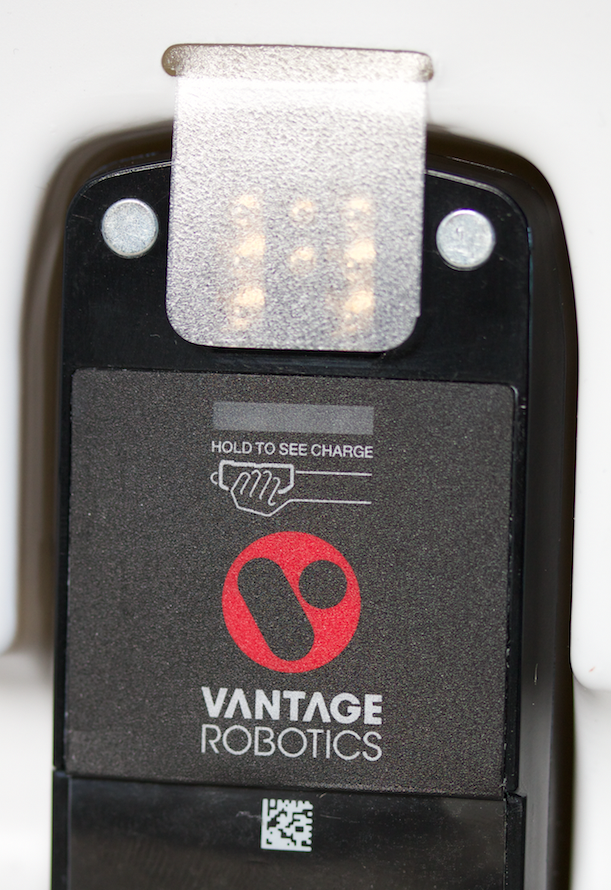
Getting You Snap’s Serial Number
You can get your Snap’s serial number by scanning the QR code located on the underside of the fuselage near the tail. There are several free QR code reader apps available that can help.
[/expand]
[expand title=”Spreading Your Wings” tag = “h1”]
Now that you’ve made it through the basics, let’s go over Snap’s fancier tricks. Note that all of these modes involve enabling software to take over flying Snap. While the software does have sophisticated ground avoidance, it is up to you to set you shots appropriately to avoid obstacles and generally not do anything stupid.
Snap uses GPS to maintain position. This means Snap is communicating with a constellation of satellites orbiting the earth 12,500 miles away in order to figure out its exact location on the planet. All autonomous modes require Snap to have sufficient GPS, which requires a clear view of the sky to communicate with those satellites.
All tracking modes also require a sufficiently accurate position estimate on your phone or bluetooth GPS tracker as as well. These devices use GPS to determine their location as well. While you can put your phone or tracker in your pocket for tracking shots, their location estimate improves with a clear view of the sky, so it’s best to keep your phone in your hands, a handlebar mount, or arm case, or the outermost pocket of your backpack. Autonomous tracking modes also require more than 30% phone battery and Snap battery remaining, as we want to be especially careful given that Snap won’t have your full attention.
Because tracking modes rely on the location estimate from your phone and Snap, which both have some accuracy limitations, you will find that the precision of the shot framing improves as Snap gets farther away. In most conditions, Snap needs to be at least 10 meters (33 ft) away from you for good framing. While this is less precise than vision based tracking, it has the big advantage of being highly robust, so Snap can continue to track you for long shots, even if you momentarily get out of frame. When doing tracking shots, we find it works best to mount your phone and tracking beacon on your arm or handlebars, so it is both easily accessible and will get a better GPS signal compared to your pocket. There are many good solutions out there for doing this, but we find the Quad Lock mounts to work especially well, given the ease of mounting and removing your phone.
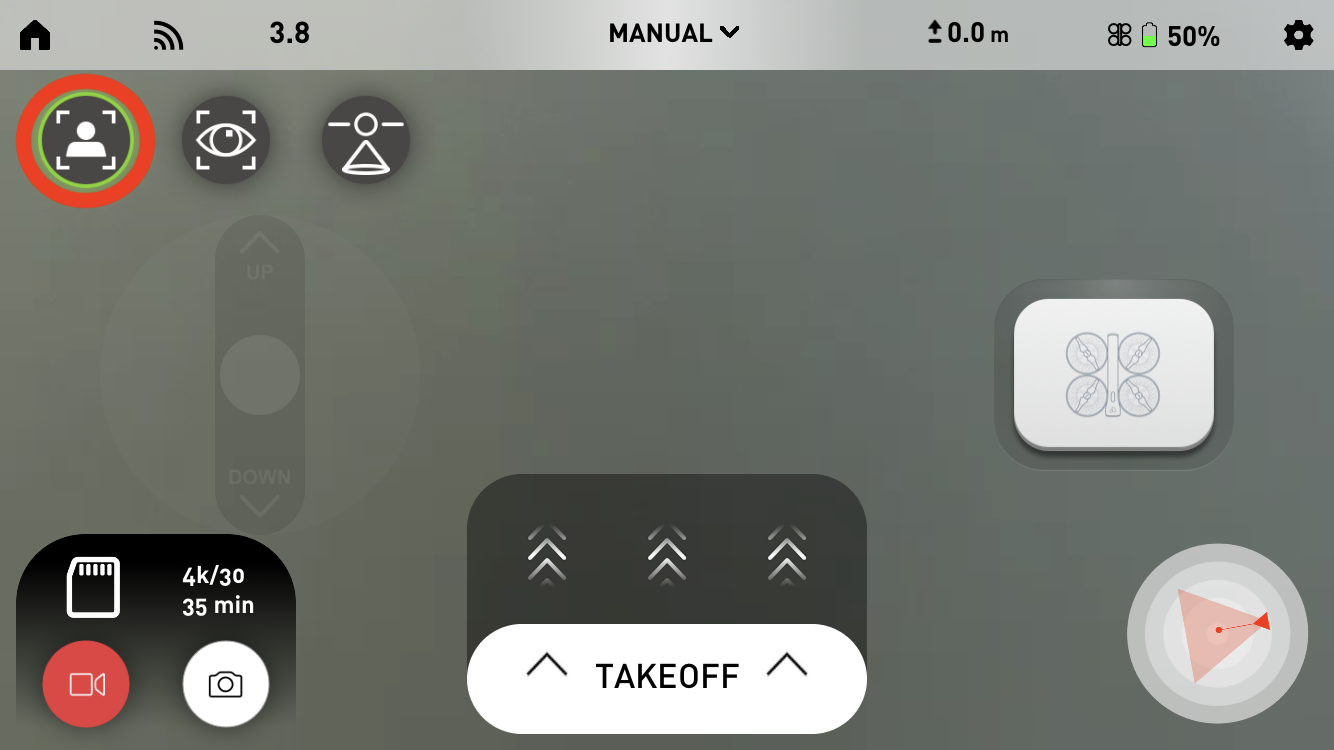
[expandsub1 title=”Look at Me, Point of Interest and VR Mode” tag = “h2”]
Look at Me (LAME) Point of Interest (POI) can be used during Manual Control as well as Out and Back shots. In both cases, the flight controller takes over the rotation control (“yaw”) and the pitch of the camera. This makes it easier to capture nuanced shots that mix many axes of control simultaneously without the challenge of trying to control five degrees of freedom at one.
Look at Me
 Look at Me (“LAME”) is the most basic tracking shot. In LAME mode, Snap automatically controls the rotation (“yaw”) or Snap and pitch of the camera in order to keep you in frame. This mode requires an accurate GPS fix from both Snap and your phone to function. Since neither position estimate has perfect accuracy, you need to be a minimum distance from Snap for accurate framing. Snap will let you know if you get too close for a good shot.
You can enter LAME mode by tapping the LAME button (shown circled in red above) from Manual Control or Out and Back modes. Snap will immediately begin tracking your phone. You can exit the mode by tapping the LAME button again.
Point of Interest
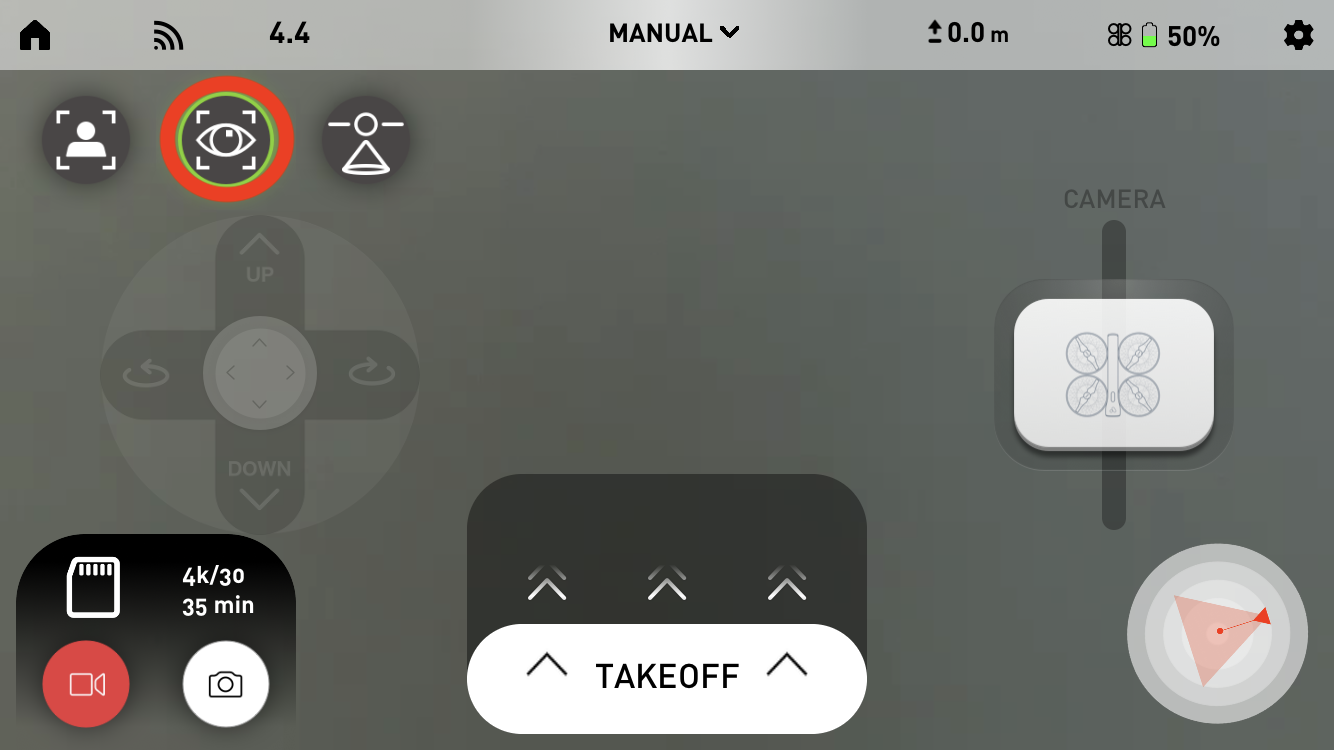
Point of Interest (POI) mode is used for doing tracking movements around fixed objects. It lets you mix rotation (“yaw”) and camera pitch automatically as you move about an object of interest. To use POI mode, frame the object of interest in the center of the screen and tap the POI button (shown circled in red above) in either Manual or Out and Back modes. Snap will attempt to adjust the rotation and pitch of the camera automatically to keep this object in frame as you move around it. Snap does this by estimating the intersection of the camera’s view with the ground, so this technique only works if Snap’s camera is facing below horizontal. It generally works best the more downwards it is looking when you set up the shot. Note that this will not work well for focusing the POI on the top of objects that are high above the ground. You can use the camera pitch and rotation control to fine tune the framing as it moves.
While POI is awesome for fixed objects, you can also utilize Vision Tracking for focusing Snap on a moving target.
Before trying to use this feature, make sure you have version 1.5.0 or later of the iOS app and the most updated flight control software, which you can update from within the app. Here’s how to use it:
- Launch your Snap and select POI mode by tapping the icon in the upper right from the manual flight screen.
- Rotate Snap and the camera to get your subject near the center of the view.
- Use two fingers to draw a box around the subject. The more closely the box fits around the subject, the better it will work.
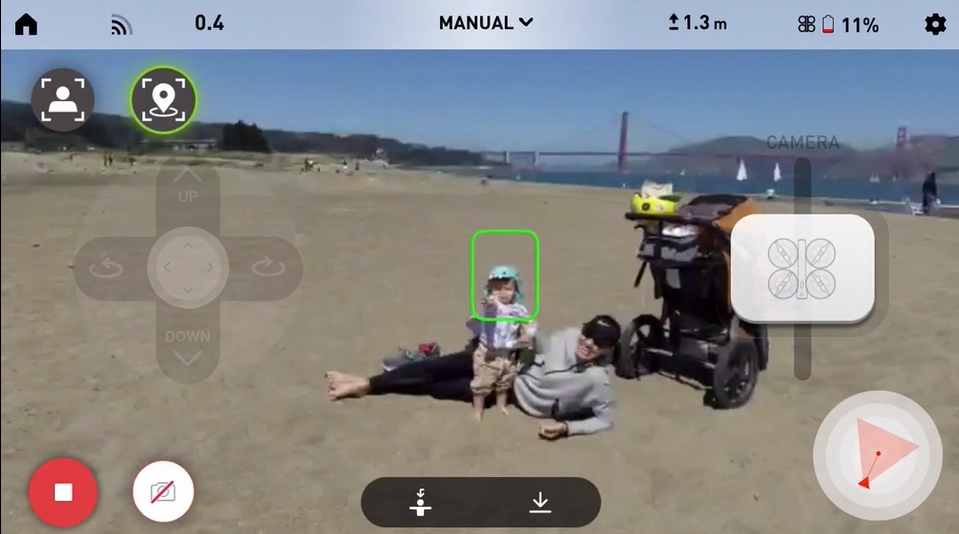
Snap will now automatically rotate and pitch the camera to keep the subject in frame. You can control Snap vertically and laterally as it does this. The previous GPS based POI mode remains functional as well, if a vision target is not selected.
VR Mode
VR mode is our most recent development. In VR mode, Snap is essentially giving you a first person view experience.
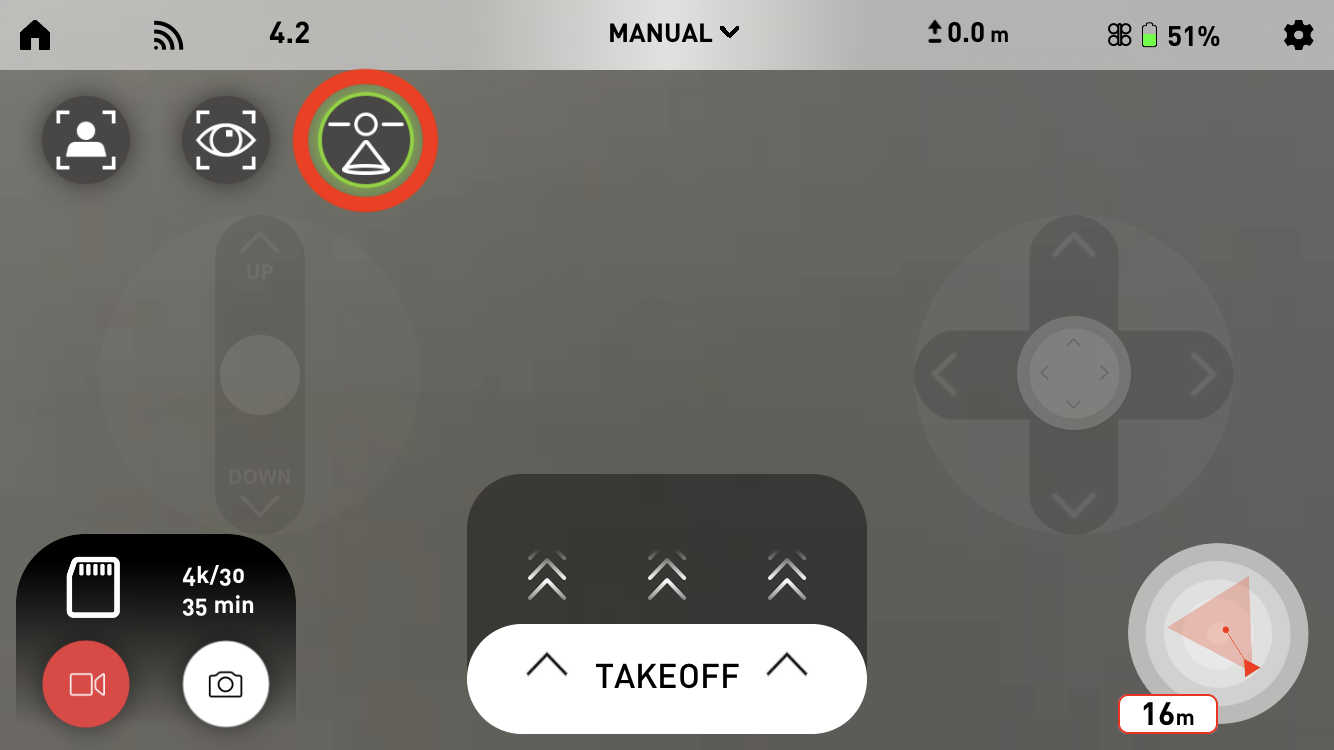
You can enter VR mode by tapping the VR mode button (shown circled in red above).
After launching, Snap will rotate and roll the gimbal to orient the camera in the direction your phone is facing. For instance, if you point your phone towards the ground, Snap’s camera will follow suit and point towards the ground. If you rotate 90 degrees to the left, Snap will rotate 90 degrees to the left as well.
Instead of tilt control being used to fly Snap, the direction the camera is facing will be relative to the direction your phone is pointing.
Snap’s altitude will still be controlled through the left onscreen stick. The lateral motion of Snap (forward and sideways motion) will be controlled through the right onscreen stick.
[/expandsub1]
[expandsub1 title=”Flight Modes” tag = “h2”]

One changes flight modes by tapping the Mode Selection button in the top center of the navigation bar (outlined in red above).
Out and Back
Out and Back mode is a predefined autonomous shot to make Snap fly a predetermined distance away from you and then back to the starting location. It’s a great way to get big shots out of Snap, especially for establishing location and geographical context.
Set up the shot by pointing the camera of your phone in the desired trajectory. You then fly Snap to the intended start location and camera orientation. Snap will fly along a path parallel to the trajectory you set. You can adjust the distance using the distance selector in the lower left of the screen.
There are three possible view modes for an Out and Back shot – fixed orientation, Point of Interest, and Look at Me. In fixed orientation mode, Snap will maintain whatever camera orientation you define at the start of the shot, so you can use this mode both for fade away shots as well and smooth strafing or approaching shots. This mode is the default. In Point of Interest mode, Snap will adjust its rotation and camera pitch in flight to maintain a view of a selected point of interest. In Look at Me mode, Snap will adjust its rotation and camera pitch in flight to keep you in view. See the Point of Interest and Look at Me mode sections for instructions on setting up these shots.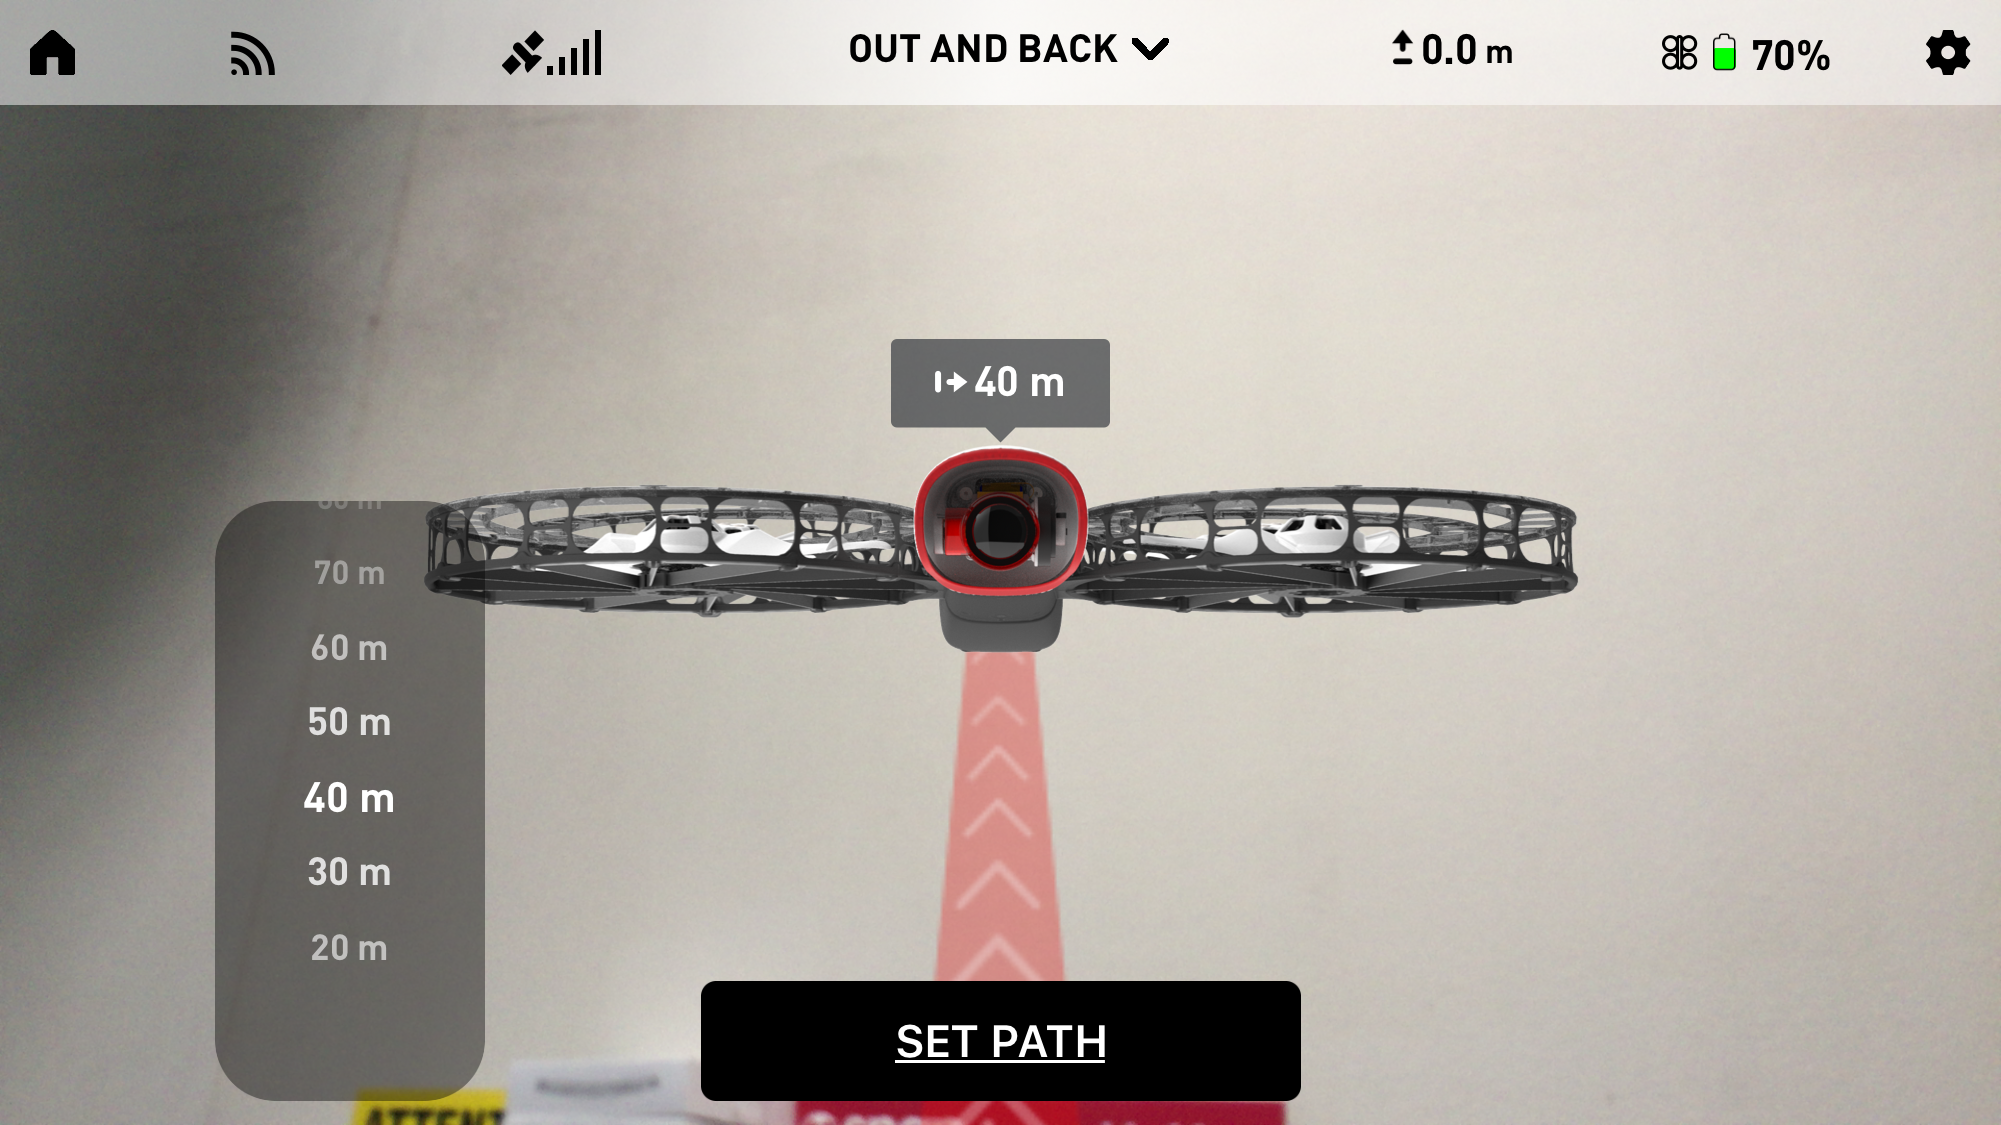 The speed can be adjusted from the Autonomous tab of the Settings menu. While Snap can avoid sloping ground, it is up to you to select a path that is clear from obstacles. Note that it is possible for set flight distances outside of Wi-Fi range. In this case Snap will reconnect as it returns. If you are close to other Wi-Fi networks that your phone is set up to autojoin, you may have to go to Wi-Fi settings to reselect the Snap access point.
Orbit
The Orbit shot is a predefined autonomous shot to make Snap fly in a circular path, either tracking you or the center point of the shot.
Set up the shot by pointing the camera of your phone in the desired trajectory. Then fly Snap to the desired start location and it will fly in a path parallel to the trajectory you set to the edge of the orbit ring.
You can select either “Track Phone” to track you or “Track Center” to track the center point of the shot as it flies. If you select “Track Phone” Snap will rotate and pitch the camera to keep you in the frame. If you move as it does this, it will adjust the center of the Orbit to maintain the same offset you defined when setting up the shot. You can adjust the distance using the distance selector in the lower left of the screen. This defines the distance from the start of the shot to the outer edge of the orbit circle.

The speed can be adjusted from the Autonomous tab of the Settings menu. While Snap can avoid sloping ground, it is up to you to select a path that is clear from obstacles.
Virtual Wire Tracking
Virtual wire is a tracking shot that constrains Snap’s movements to a line in 3 dimensional space, while Snap rotates and pitches the camera to keep you in frame. This shot enables you to control Snap’s path relative to you and create interesting movements between the subject and camera.
To enter this mode, select the mode button from the center top of the flight screen and tap “Virtual Wire. In order to set up this shot, you point your phone’s camera in the intended trajectory and set the path. You can then fly Snap to any location and its movements will be constrained to a 3-dimensional line parallel to the path you defined.
Snap will automatically avoid sloping ground, but it’s up to you to select a path that is free from obstacles.
Free Follow Tracking
In Free Follow Tracking mode, Snap is free to move in any direction to keep you in the frame. This shot is especially good for tracking more complex motions, like hiking, mountain biking, or surf sessions.
After selecting this mode, you should fly Snap to the desired relative position. Flying Snap further away will improve the quality of the framing of the shot, at the expense of detail on the subject. We find 10-20 m range is a happy medium. One can also shoot wider in 4k shooting mode and then punch in using video editing software later.
After pressing “Start Tracking” Snap will move in all directions with you while maintaining the same offset. You can press “Cancel Tracking” at any time to return to manual mode flight.
One can use Free Follow tracking with two alternative settings, fixed offset and lasso modes, which are selected in the “Autonomous” tab of the settings menu.
In fixed offset mode, Snap attempts to maintain approximately the same geographic offset to you as you move. After selecting this mode, you should fly Snap to the desired relative position. After pressing “Start Tracking” Snap will move in all directions with you while maintaining the same offset. We’ve designed the controls to have some motion in this offset to keep the shot visually interesting, but it will always return to the preferred orientation. This shot gives you more control on lighting angles and orientation relative to the subject. As a general rule, it works well to position Snap between yourself and the sun in order to avoid backlit shots.
In lasso mode, Snap will try to maintain approximately the same distance you set when you press “Start Tracking” and will follow the shortest possible path to keep tracking you. This setting results in the smoothest camera motions when you expect to be moving and changing directions quickly. It tends to create more of a following shot.
When in tracking mode, all buttons other than the “Cancel Tracking” button on the screen are disabled to avoid unintentional button presses if you put your phone in your bag or pocket. You can slide “Cancel Tracking” upwards at any time to return to manual mode flight.
We recommend selecting “Look at Me” mode, before going into this tracking mode. This way, if you need to stop tracking and reposition the camera, you can make smooth transitions.
Snap will automatically avoid sloping ground in this mode, but it’s up to you to make sure Snap doesn’t get taken out by a tree or any other obstacle.
[/expandsub1]
[expandsub1 title=”Using a Bluetooth GPS Tracker” tag = “h2”]
You can use an off the shelf bluetooth GPS tracker to improve the accuracy of your tracking shots. We’ve found the Garmin GLO and the Dual Electronics XGPS 160 to both work well. Like your phone’s GPS, these devices will have the most accurate location estimate if they have a clear view of the sky. We like using the universal mount of the Quadlock mounting system. You can then use the bike mount to attach your tracker to your handlebars or the armband to attach it to your arm. You can also attach the tracker to someone else and fly Snap in Look at Me Mode, so Snap will automatically control camera pitch and yaw to keep your subject in view, and you just need to control position and altitude. Note that this will only work on flat surfaces, as your altitude estimate will come from the phone in your hands.
[/expandsub1]
[expandsub1 title=”Return to Home and Return to Pilot” tag = “h2”]
Snap has the ability to fly back to you or it’s takeoff location. It will do this either after you press the RTH button or if it loses connection for over 30 seconds.

You can decide whether Snap returns to you or the take-off location by selecting “Return to Home” or “Return to Pilot” from the “Autonomous” tab of settings. We especially recommend selecting “Return to Home” when doing any sort of shots over water (assuming home is on the shore) and selecting “Return to Pilot” whenever doing any long distance tracking shots.
If Snap is within 20 meters of your location or the takeoff location, it will return to home slowly at its current altitude, while avoiding the ground. If Snap is further away, it will climb to the RTH altitude before flying back to you. This is set to 3 meters by default, by can be changed by you in Settings on the Autonomous tab.
[/expandsub1]
[expandsub1 title=”Auto Landing” tag = “h2″]
Snap will land automatically when battery levels get to about 5%. Snap will initiate auto land earlier if it is high off the ground to make sure it has enough juice to make it down. The app will warn you at 20% and 10% so this doesn’t catch you off guard.
[/expandsub1]
[expandsub1 title=”Hand Take-off and Landing” tag = “h2”]
 Hand takeoff and landing is much faster and more convenient than ground takeoff, but it does require some care to avoid finger contact with the propellers (this hurts, but won’t slice or dice). We recommend landing on the ground in windy conditions.
Holding Snap in one hand from the top and phone in the other (Snap in your left hand and phone is our preference), slide the “Takeoff” button upwards. The props should spin up.
DO NOT LET GO OF SNAP IMMEDIATELY.
The props will take about 2 seconds to spin up and be ready for hover. Snap should feel nearly weightless.
You should be able to fly Snap away from you using the controller as you let go.
If Snap has GPS lock, it will also maintain position. Otherwise, it will maintain attitude and drift laterally until you take control.
To hand land, fly Snap back to you, grab onto the fuselage and battery from the top and twist Snap briskly in a flat orientation.
 When using Apple phones with 3D Touch (iPhone 6s and later), a firm press is required to activate tilt control. This reduces the chance of unintentional camera pitch movements. For devices without 3D Touch, there is a small amount of deadband to prevent unintentional movements.
[/expandsub1] [expandsub1 title=”Left Stick Axis Lock” tag = “h2″] When using Apple phones with 3D Touch (iPhone 6s and later), one can use the axis lock feature to do pure rotation or climb/descend motions. To use axis lock, press firmly on the left stick and begin the intended motion. The controller will limit input to whatever axis you begin motions on. Axis lock can be released by removing removing your finger from the stick momentarily.
[/expandsub1] [expandsub1 title=”Using a Bluetooth Game Controller” tag = “h2”] Snap is designed to work with any game controller that supports GameCenter for iOS. We’ve tested with the MadCatz and SteelSeries controllers with good results. Android supports the Xbox One game controller and the GameSir G3s. To use, pair your phone with the controller and turn on game controller support in the Controller tab of Settings. The game controller’s right right stick will now control Snap’s lateral motion and left stick controls altitude and yaw. The right shoulder buttons can be used to rotate the gimbal up and down. All other controls remain active on the phone as well.
Two stick controllers let you have an unobstructed view of the video feed from Snap and give more tactical feedback when doing full manual control, albeit at the expense of another piece of hardware you need to feed and carry. We recommend trying turning “Smart yaw” off when flying with a bluetooth controller and primarily watching the video feed for control, as this way the camera movements will be relative to the view you see on the screen.
[/expandsub1] [expandsub1 title=”Tips and Tricks” tag = “h2”] There is no right way to use Snap, but we have found some techniques we like that we wanted to share:
- Use the assisted and auto modes: We’ve gotten most of our best footage when we use the assisted and autonomous modes. We know it’s scary letting software take over at first, but trust us, the software is most likely better than you.
- Turn on exponential: This is a controller setting that reduces the sensitivity for small movements and increases it for large movements. It is turned off in the default settings, as it makes Snap feel less responsive, but the video looks way better, as it tends to smooth out small motions.
- Less is more: Keep the maximum speed settings as slow as possible. Yes, it’s fun to go fast. But unless your subject is moving fast, your video will look best with slow and smooth camera movements.
- Post process: Snap is designed to make video straight off the SD card look good. But there are some trade-offs that make some posts processing with video editing software a good idea for best results. First, Snap uses a flatter color profile to avoid losing information with saturation. If you want especially vivid colors, you can get this best by recoloring using video editing software, like Adobe Premiere or FinalCut. Additionally, some post stabilization will improve video quality when shooting in 4k in windy conditions. We recommend a small crop margin (10% or so) and selecting stabilizing only (in the event fancier stabilization options are available).
If you have tips that you’d recommend including on this list, please let us know!
[/expandsub1]
[/expand]
[expand title=”Base Station and Live Streaming Instructions” tag = “h1”]
For Gen. 3 Base Stations
Please contact Assaf Stoler with any questions:
assaf@vantagerobotics.com
[expandsub1 title=”Initial Setup” tag = “h2″]
[expandsub2 title=”Everything You Need” tag = “h3”]
Everything You Need
This document assumes the reader is already familiar with operation of the Snap flying camera. For general Snap app and flight instructions, see the manual.
To do broadcast streaming with the base station, you will need:
- Base station
- iPhone 7 or newer (8 or above recommended) or late-model iPad
- A Snap flying camera, with optional DSM remote
- The special broadcasting-version Fly Snap app installed via Test Flight
First-time setup may also require a computer to put a file on a MicroSD card.
[/expandsub2]
[expandsub2 title=”Base Station Setup” tag = “h3”]
Base Station Setup
- The base station is designed to mount to a tripod and should be at least 3 feet off the ground for optimal range and link quality. A clear line of sight between the antenna and Snap is crucial for best range.
- The folding, USB-connected antenna must be plugged into its ‘base’ and unfolded to the open position. The flat side of the antenna should face where Snap will be farthest away.
- Connect the HDMI to your stream capture device/monitor, and connect the lightning cable to the control iPhone/iPad.
Turning On the Base Station
- Switch on the battery power switch on the front of the base station.
- Push the base station power button once. The light on the base station will turn blue. After about 60 seconds the base station is ready to stream.
Shutting Down the Base Station
To power down the system, press the base station power button once. A display on the screen will begin a 60-second countdown after which the system will power down automatically (N.B. this timer will show on the video stream if someone presses the power button while broadcasting). Please do not remove power from the unit until the shutdown is complete, indicated by the power button color changing to orange.
Other Base Station Usage Notes
- The base station itself arrives fully programmed and ready to use out of the box.
- The Lightning cable supplies the control iPhone/iPad with network and power.
- The HDMI output will automatically match the native resolution of the screen/device it is connected to.
- Until there is a video stream, a computer desktop will show over HDMI.
- If a computer mouse is plugged in, a cursor will show over the video when moving.
- The power button on the front of the main computer box will be lit at all times when the battery is switched on. It is orange when off and blue when on.
- There is no requirement to power up devices in any particular sequence. If the first-run setup has been completed, streaming begins immediately by hitting record in the app (fresh power-up) or automatically (reconnect / restart of client or app).
- The built-in 9 cell battery should last 3-5 hours depending on the device used to fly (including charging the pilot’s iPhone/iPad).
[/expandsub2]
[expandsub2 title=”One-Time Snap Setup” tag = “h3”]
One-Time Snap Setup
- Snap must be set to a Wi-Fi SSID with the sequence Snap_VFXXXXXXXX (all units need to use the same ID at this time) as the base station is currently hard-coded to look for your Snap’s specific ID.
- If your Snap’s Wi-Fi SSID is not set to the same sequence (Snap_VFXXXXXXXX), you can change it by installing the linked wifi.conf.force file. Instructions for installing this file are as follows:
- Insert Snap’s SD card into the computer.
- Copy the wifi.conf.force file to the root directory of the SD card (not in a folder)
- Remove the SD card from your computer and insert it into Snap.
- Power-on Snap. Snap will be ready with the new Wi-Fi SSID in about 20 seconds
- The Wi-Fi password for all your units and base stations is customer specific. If you lose/forget your password please contact Vantage Robotics.
[/expandsub2]
[expandsub2 title=”One-Time Phone Setup” tag = “h3”]
One-Time Phone Setup
- Ensure Fly Snap app and Snap firmware are up to date
- Update the Fly Snap app to the latest version using the Test Flight app.
- Connect the phone directly to Snap’s WiFi. The phone can only be directly connected while the base station is off. For a broadcast set up, the phone is only connected directly to Snap’s WiFi to update firmware.
- If a firmware update is available, a popup will show automatically when Snap is connected and the app is opened.
- Configure control iPhone/iPad network settings
- Turn off iPhone/iPad WiFi (Airplane mode recommended).
- Ensure Lightning cable is connected and go to iPhone/iPad settings.
- Below the Wi-Fi entry, select “Ethernet” (see Figure 2)
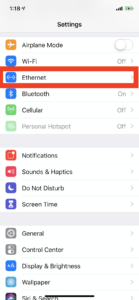
Figure 2: Select Ethernet Option - Select “Gigabit + Power” (see Figure 3)
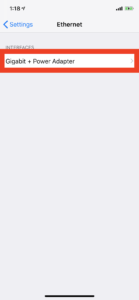
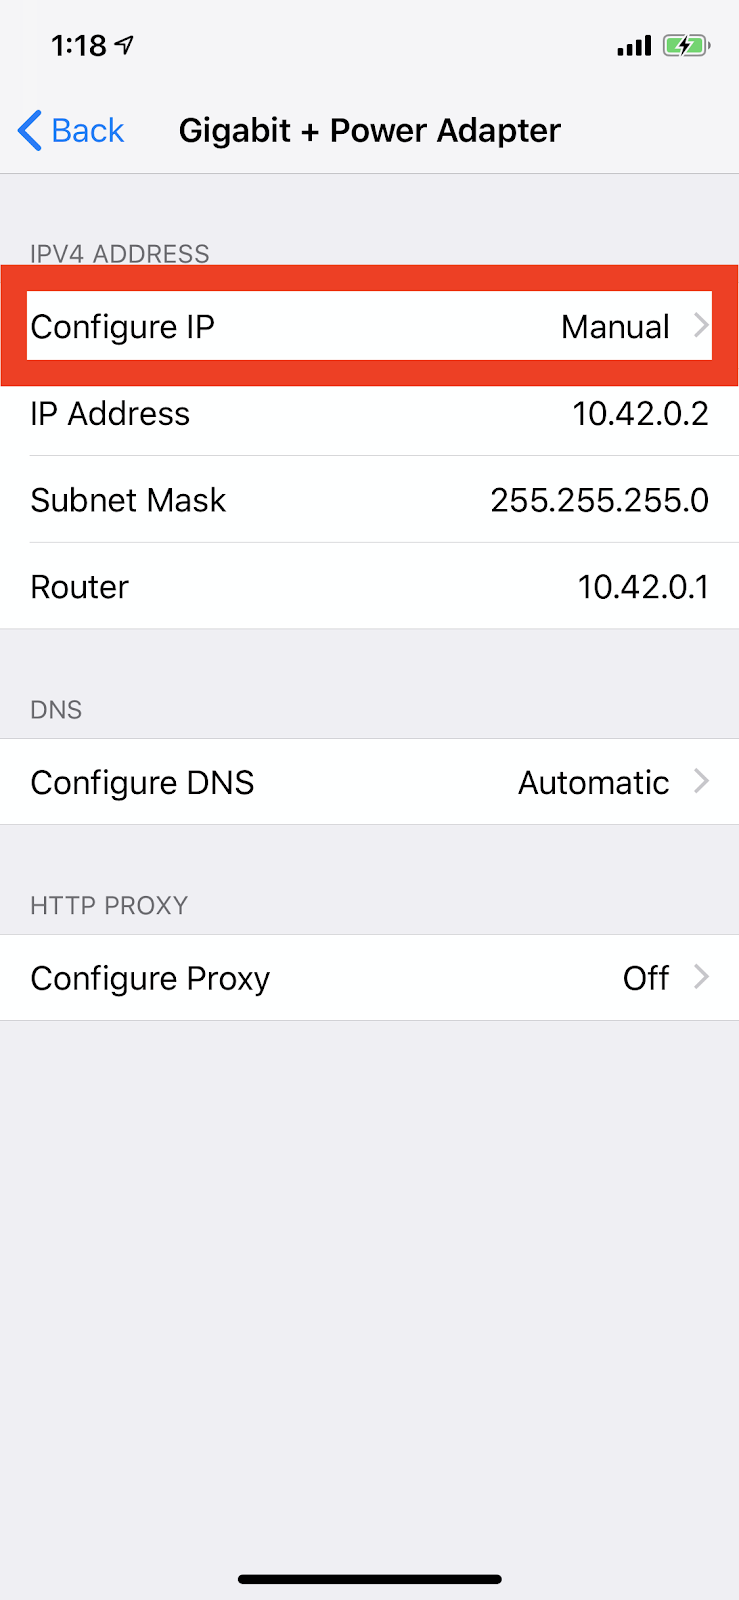
Figure 3: Select Gigabit + Power Adapter - Select “Configure IP” (see Figure 4)
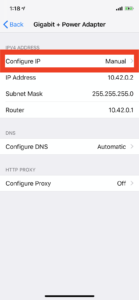
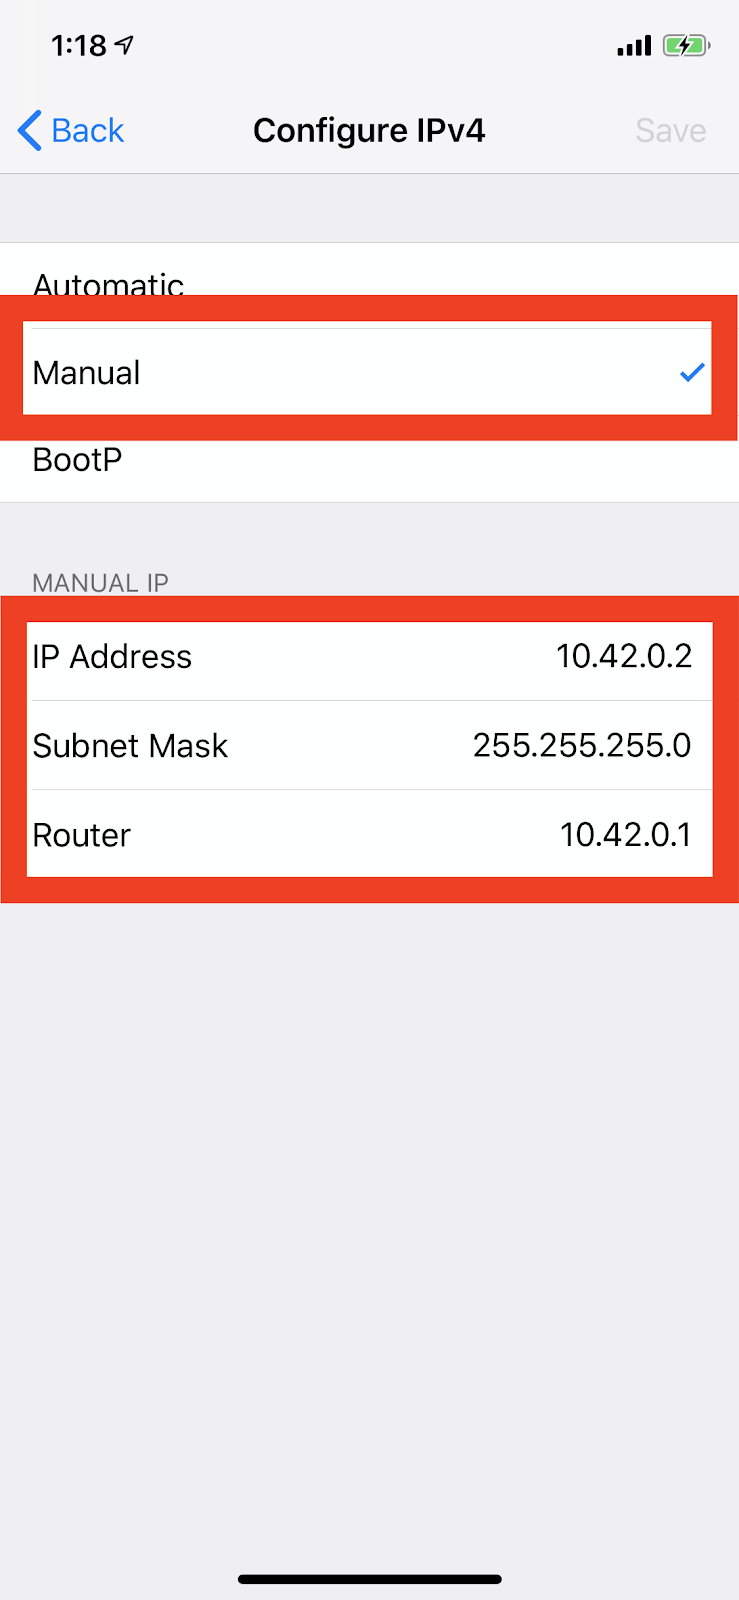
Figure 4: Select Configure IP - In the Configure IPv4 menu, select Manual configuration and set the following (see Figure 5):
- IP Address: 10.42.0.2
- Netmask: 255.255.255.0
- Router IP: 10.42.0.1

Figure 5: The following configuration should match
- Press “Save” to complete IP configuration.3. Configure Fly Snap app network settings
- Open the Fly Snap app and access the hidden settings menu by tapping the upper-left corner of the main menu settings page three times.
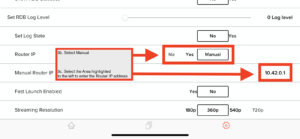
- Set ‘Router IP’ field to ‘manual’
- Set the ‘Manual Router IP’ to 10.42.0.1, then quit and restart the app.
- (Optional) Snap’s WiFi channel now defaults to 153 (after latest wifi.conf applied). When connected to a Snap, at the bottom of the hidden options menu is a “Change WiFi channel” function. For best performance, the 5.8 GHz channels (149 to 165) are recommended.
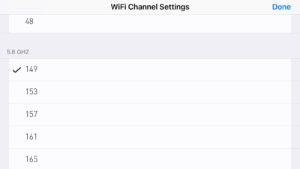
Figure 7: 5.8GHz is the optimum WiFi channel range.
[/expandsub2]
- Turn off iPhone/iPad WiFi (Airplane mode recommended).


[/expandsub1]
[expandsub1 title=”Normal Operation” tag = “h2″]
[expandsub2 title=”Starting the Broadcast Stream” tag = “h3”]
Starting the Broadcast Stream
After completing the first-time phone and Snap setup per the above instructions, starting the stream is simple:
- Power on all devices and wait for the video to start streaming to the phone’s screen.
- Confirm the correct streaming settings in the camera settings page
- Press the red Record button in the lower left corner to apply streaming settings and initiate the broadcast stream.
Other Notes on Broadcast Stream Settings
- Even if the recording button is toggled on/off, the broadcast stream will remain on and continue if Snap is power cycled or disconnected/reconnected. To disable the broadcast stream, set Broadcast Streaming Enabled to No, press the Record button to apply the settings, and power cycle Snap.
- Currently, only 1080p30 resolution is officially supported for broadcast streaming. This will be the only recording option available if broadcast streaming is selected (see Fig 5).
- This base station supports bitrates up to 15 Mbps to a distance of 150m. Lower bitrates may offer more stable streaming in areas with heavy WiFi use.
- Troubleshooting: If the pilot stream (on the phone/ipad) does not start within a few seconds, the stream can be manually reset by changing the pilot stream resolution in the bottom of the hidden menu. Note that for optimum main stream bandwidth, a 180p pilot stream is recommended. At the time of this writing, the pilot stream resolution setting is not yet persistent and must be set again after app or Snap restart.
[/expandsub2]
[expandsub2 title=”Additional Controls” tag = “h3”]
Additional controls
Output resolution may be changed by connecting a USB mouse and opening the display preferences, for which a shortcut is on the desktop. This does not affect the resolution of the stream coming from Snap, only the scale of the output from the base station.
[/expandsub2]
[expandsub2 title=”Updates” tag = “h3”]
Base Station Updates
System updates will be emailed as needed as Vantage continues development.
Follow the steps below to install the update:
- Insert a USB flash drive into your computer and rename it to “SnapRptUp” case-sensitive.
- If you are unable to change the USB flash drive name, you may have to reformat it. The format the drive should be formatted to is “Exfat”
- If the update files come as a single zip file, unzip the files into a folder.
- Copy the files from within the unzipped folder into the root of a USB Flash drive.
- Power-off the repeater if it is powered on.
- While powered off, insert the USB drive into the repeater.
- Power on the repeater and the install will begin automatically.
[/expandsub2]
[expandsub2 title=”Charging” tag = “h3”]
Charging
To charge the battery connect the supplied 12.6V AC adapter and switch the battery to ON. Use only the supplied adapter to charge the battery, charging from a higher-voltage source may damage the battery.
[/expandsub2]
[/expandsub1]
For Rev 1.0 Base Stations
[expandsub1 title=”Base Station Instructions” tag = “h2″]
[expandsub2 title=”Initial Set-up” tag = “h3”]
Initial Set-Up
2. Make sure the battery pack switch is set to the on position (-).
3. Turn on the Base Station by pressing the power button. The power button will be backlit by a blue LED when the Base Station is running.
– The Base Station will take about 1-2 minutes to start up.
4. While the Base Station is starting up, connect the battery and rotor set to Snap. Snap will play a short tune when it turns on.
– The Base Station will automatically connect to Snap when it sees Snap’s WiFi is up.
[/expandsub2]
[expandsub2 title=”Starting the Fly Snap App (Primary Pilot Control App)” tag = “h3”]
Starting the Fly Snap App (Primary Pilot Control App)
2. On the iPad Mini, open the preinstalled Fly Snap application.
3. If the iPad Mini is connected to the Base Station correctly, the center button in the Fly Snap app will show Connecting.
4. After Snap connects to the Base Station, the Center Button in the Fly Snap app will show Go Fly.
5. Press the Go Fly Button on the Fly Snap app to go to the main pilot screen. The live stream will appear shortly in the flight window.
Starting the Snap View App (Secondary Pilot Control App)
2. On the iPad Pro, open the preinstalled Snap VR View app.
3. If the iPad Pro is connected to the Base Station correctly, the center button in the Fly Snap app will show Go Fly.
4. Press the Go Fly Button on the Fly Snap app to go to the Secondary Pilot View.
5. When Snap has connected to the Base Station and is Streaming to the Fly Snap Pilot app on the iPad Mini. The Secondary High-Definition stream will appear on the Snap VR View app’s Secondary Pilot View on the iPad Pro.
Base Station Features
– To Zoom in/out of the High-Definition stream, use the pinch gesture directly on the Snap VR View Secondary Pilot View to zoom in and out of the High Definition stream. – To change the resolution of the Secondary High – Def stream, change the recording resolution in the Camera Settings of the Fly Snap Pilot App. The Secondary High-Def stream will play back in the Snap’s recording resolution. Snap does need to be recording for the High-Def stream to work.
– To get the High-Def or Broadcast Stream through HDMI, connect your HDMI monitor or device to the HDMI output on the front of the Base Station while it is streaming the High-Def broadcast stream.
Troubleshooting
– Make sure Snap is powered on and the gimbal is active (moves as Snap moves). Snap will power off to conserve battery if it has not flown for 5 minutes.
– Unplug and replug in the USB-C TP-Link Antenna on top of the Base Station
The Fly Snap app or the Snap VR View App won’t stream.
– Turn off then turn back on the WiFi capability in the iPad Settings app. Sometimes when moving between Base Stations, the network configuration can sometimes not clear on the iPad. Turning Off then On the WiFi will clear those settings.
The Snap VR View App’s VR View isn’t moving Snap’s camera or yaw even though the iPad’s orientation has changed
– Make sure you are not using an iPad Pro case with a magnetic flap to protect the screen. The magnetic flap can interfere with the iPad Pro’s internal compass and cause interference with the iPad Pro’s orientation calibration.
– Move the iPad Pro in a figure eight motion. Sometimes the iPad Pro’s orientation detection can go to sleep if it has been inactive for a while. Moving the iPad Pro in a figure eight will re-enable it.
If problems persist or are not found on this sheet please reach out to support at support@vantagerobotics.com or contact your sales representative.
[/expand] [expand title=”Firmware Updates” tag = “h1”]
For iOS Users
Updating your app: You can update your app by navigating to the “Updates” button in the bottom right corner of your App Store app. From there, scroll down until you see the Fly Snap app, and press the “Update” button next to it. Make sure to only upgrade one firmware at a time. Pressing an upgrade button during a different upgrade may cause it to fail and revert back to old firmware.
[expandsub1 title=”iOS Firmware Upgrade Instructions” tag = “h3”]
- An SD card must also be inserted in Snap for the update to work properly.
- Power on Snap by attaching a battery pack.
- Connect to Snap with your iPhone and launch the Fly Snap application.
- Press the General Settings menu button (indicated by a gear wheel icon) in the bottom right corner of the home screen as shown in Figure 1 below.
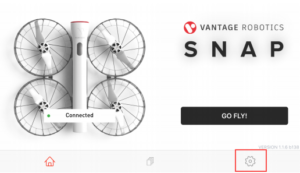
Figure 1: Press the General Settings menu option
- In the General Settings Menu, scroll to the bottom of the menu and press the UPGRADE FLIGHT SOFTWARE BUTTON as shown in Figure 2.

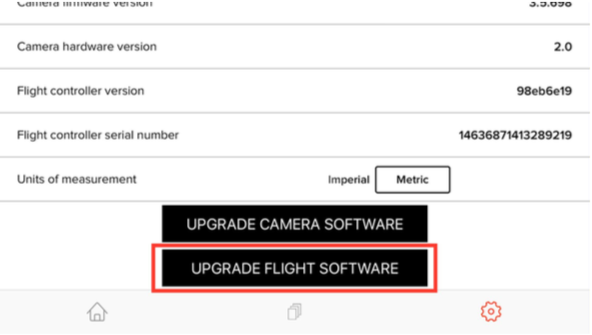
Figure 2: Press the UPGRADE FLIGHT SOFTWARE button in the General Settings menu
6. A pop up (Figure 3) will appear to confirm that you are ready to upgrade. The upgrade time will take approximately 5 minutes.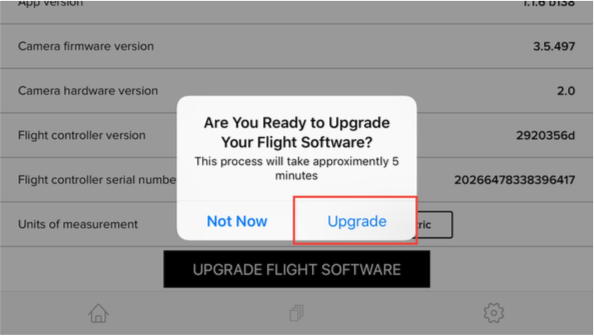
Figure 3: Press Upgrade in the confirmation pop up to begin
- The app will now begin uploading the new firmware onto your unit. A screen, with the firmware percent uploaded, will appear as shown in Figure 4. The upload time should only take a few seconds.

Figure 4: Screen with the percent of firmware uploaded shown
- When the app has finished uploading the new firmware, Snap will automatically start the firmware installation. A screen with the installation description will appear as shown in Figure 5.
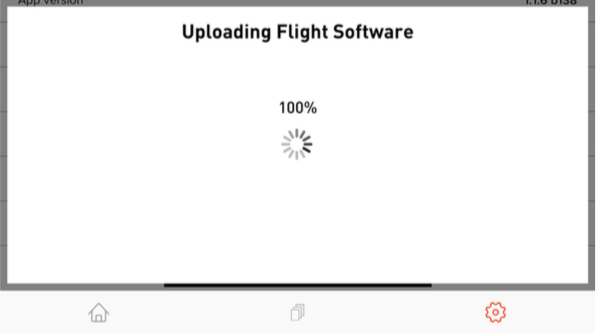
 Figure 5: The installation description shown after the software upload is complete
9. Snap will now start playing a tune to indicate the firmware installation is in progress. This will take about 5 minutes to complete.
10. When the installation is complete, Snap will stop playing the tune. Leave Snap attached to battery for 1-2 minutes. At this time, power cycle Snap by removing the battery from Snap for at least 5 seconds and re-attaching it. Snap will power up using the new firmware.
11. Connect to Snap and go back to the General Settings menu. If your screen looks like Figure 6, proceed to Step 12. If your screen looks like Figure 7, proceed to step 13.
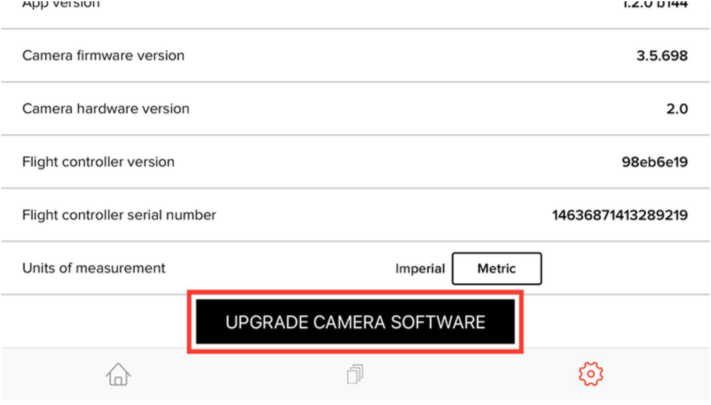
Figure 6: UPGRADE CAMERA SOFTWARE Button is still visible
12. If the UPGRADE CAMERA SOFTWARE button is still visible, press it and repeat steps 6-11 to upgrade the camera software.
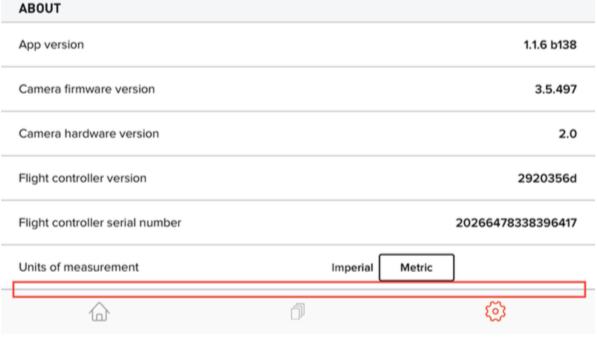
Figure 7: The UPGRADE FLIGHT SOFTWARE button will not appear after a successful upgrade
Please contact customer support if you have any questions. (510) 907-7012
Thank you!
[/expandsub1]
For Android Users
Updating your app: To update the Android Application: Go to the Play Store application. In the left menu select “My apps & games”. Under “updates pending” select the Update button to the right of the Snap app to update to the latest version.
[expandsub2 title=”Android Firmware Upgrade Instructions” tag = “h3”]
-
There are two files required to update your firmware. The camera firmware, vrqc_fw.bin, and the flight controller firmware, firmware.px4. It is important that the file names are not changed when downloaded to your computer. Make sure to only upgrade one firmware at a time.
• Camera version v3.5.1182 can be downloaded here.
• Flight Controller firmware can be downloaded here.
- Remove the Micro SD card from your Snap, and connect it to your computer using the SD card adapter.
- Drag the file onto your card. Make sure that you load it onto the home/root directory of your card, and not in any sub folders.
- Eject the SD card and insert it back into your Snap.
- Attach the battery and power up your Snap.
- Once powered on, Snap will automatically download the new firmware. It will take a few minutes and will make sounds as it loads.
- Once all the sounds are done, remove the battery for 3 seconds, then power Snap back on.
-
Snap will automatically delete the files from your SD card if the upgrade is successful. You can double check that the process worked by looking for these files on your SD card. If they are there, try again.
[/expandsub2]
[/expand]
[expand title=”Settings” tag = “h1”]
All flight and camera settings are accessible by tapping the gear icon on the top right from the flight screen. Top level settings are accessible from the gear tab on the home screen.
Camera
| Name | Values | Description |
| Frame rate/ resolutions | 4k x 30 fps 1440 x 30 1080 x 30,60,120 fps 720 x 30,60,120,240 fps | Select desired frame rates and resolutions. Video streaming is not available in the 120 fps and 240 fps high frame rate modes. |
| Electronic Image Stabilization | On, Off | Additional image stabilization. Only available in 720 and 1080 resolutions at 60 fps or less. |
| Zoom | 1x, 2x | 2x zoom reduces lens angle from 85 degrees to 42 degrees. Only available in 720 and 1080 resolutions. |
| Auto record | On/Off | “On” means that Snap will begin recording on takeoff and stop recording on landing, automatically. “Off” means that you will manually start and stop recording. |
| Burst mode | On/Off | When on, Snap takes three pictures in rapid succession with a single shutter click. |
Flight
| Name | Values | Description |
| Speed | Slow, Medium, Fast | This changes how fast Snap moves laterally and vertically. When in GPS control mode, Snap’s lateral movements are set 4,7, and 10 m/s for slow, medium, and fast modes. When in direct control mode, Snap’s maximum tilt angles are set to 25,30, and 40 degrees. This limits Snap’s maximum rates of acceleration. Snap’s climb and descent rates are set to 1, 2, and 3 m/s for slow, medium, and fast speeds. |
| Max distance | None, 50, 75, 100 m | Geo-fence limiting movement of Snap to a maximum distance from the pilot. Functional only when Snap has a GPS fix. |
| Min ground height | 0, 0.5, 1, 1.5 m | Height at which auto ground avoidance kicks in. |
| Max altitude | 20 m, 50 m, 100 m | Limits |
Controller
| Name | Values | Description |
| Beginner mode | On, Off | Setting to on changes all flight controls to most conservative values for ease of flight. |
| Tilt sensitivity | Low, Medium, High | Changes range of controller movement necessary for full control range. Slow = 120 degrees, medium = 90 degrees, fast = 60 degrees. |
| Smart yaw | On, Off | Enabling makes movement of Snap relative to user. Tilting the phone to the right will make Snap go right or tilt right. This mode can be used with either Position or Direct flight control. This depends on accurate calibration of the phone magnetometer. |
| GPS mode | Manual, Auto | Auto GPS mode turns on GPS position control when sufficient GPS is available. Manual GPS mode enables you to switch between direct control and GPS position control at your discretion. |
| Tilt control exponential | None, Some, More | Exponential control reduces sensitivity for small movements and increases it for larger movements, making both fine and fast movements possible. You will get better video quality with more exponential, but it feels less responsive. |
| Enable game controller | On, Off | Switch this to on to use a bluetooth game controller for flying Snap. |
| One-handed flight mode | Yes, No | In one handed flight mode, tilt control remains active if you press the Tilt Control button and the left stick and then remove your right finger from the Tilt Control button, but leave your left finger on the left stick. You can then completely control Snap with one hand. |
Autonomous Control
| Name | Values | Description |
| Return to home altitude | 3,10, 20, 30, 40, 50 m | Snap will climb to defined return to home altitude before beginning the return. It will descend back to the ground once it reaches the takeoff position. |
| Auto return | Return to home, Return to pilot | Determines whether Snap returns to takeoff location or pilot location on signal drop. |
| Canned flight speed | 1, 3, 5 m/s | Determines flight speed for OAB and Orbit shots |
General Settings
Shown in the top level view of the app.
| Name | Values | Description |
| App version | Current version number | Helpful for customer support if you have any issues. |
| Camera firmware version | Current version number | Helpful for customer support if you have any issues. |
| Camera hardware version | Aircraft version number | Helpful for customer support if you have any issues. |
| Flight controller version | Current version number | Helpful for customer support if you have any issues. |
| Flight controller serial number | Flight controller serial number | Helpful for customer support if you have any issues. |
| Units of measurement | Imperial / Metric | Determines units used for distance and speed in app. |
Sandisk Extreme 16Gb
Sandisk Extreme 32Gb
Sandisk Extreme 64Gb
Sandisk Extreme Pro 16Gb
Sandisk Extreme Pro 32Gb
Sandisk Extreme Pro 64Gb
Sandisk Extreme Plus 32Gb
Sandisk Extreme Plus 64Gb
Lexar 1000x 64Gb,32Gb,16Gb
[/expand] [expand title=”Troubleshooting” tag = “h1”] We’ve engineered Snap for maximum reliability, but it is a new product and still does have some occasional quirks. Here’s what to expect and how to handle them.
| Issue | Resolution |
| WiFi connection drops out | We have some software improvements to WiFi which are still in the works and the range is not as good at the moment as it will be soon. If you have especially big hands, this can reduce the range, especially if you hold the phone tightly, as your hands can block the antenna in some circumstances. Repositioning your hands or keeping a looser grip can improve range. Additionally operating in highly crowded WiFi environments or other areas with significant interference can dramatically shorten the range. |
| One or more motors doesn’t start on takeoff | Check to make sure all propellers can spin freely. If the motors are free from obstructions, give it another try. In the event that they continue to have problems, disconnect the rotors from the fuselage and look for dirt on the magnets or connection area. |
| Video stream is not appearing on phone | There is an intermittent bug with video streaming that can be worked around by navigating back to the home screen and then returning to the flight screen. |
| Video has momentary jerks when in EIS mode | This is a known bug with the current camera firmware and will be fixed in the next release. |
| Recorded video looks bad | This is usually caused by something going wrong with the gimbal. Start by checking that the gimbal can rotate smoothly in both axes. Check to see if any debris is jamming the gimbal motors. A good strong puff of air with your mouth can be used to dislodge sand or similar contamination. |
| Streamed video looks bad | Note that Snap streams a lower quality video to your phone than it records to the microSD card. If the video is not stable, this can be an indication of a momentary loss of lock for the gimbal. If the gimbal does not regain lock, you should inspect it for damage. |
| Gimbal looks like it has hiccups | Infrequently, the gimbal calibration values can become corrupted. You can reset them by powering on the system and rotating the gimbal to the far end of its travel in both axes and holding it in that position for 20 seconds. The gimbal will recalibrate after you let go. Snap does this best if you leave it motionless, ideally on a stable surface. |
| I’m out of frame during a tracking shot | Four things can cause this:
|
| Props didn’t shut off on landing | In the event Snap lands in an unstable spot, sometimes it has a hard time detecting the landing, and the props can stay on. You can either pick it up and twist quickly or if all else fails, pull the battery off. |
| Magnetometer won’t recalibrate | Things like steel beams in houses, metal tables, and fridge magnets can all potentially throw off the compass if they’re close enough. Often, going outside in open space and wiggling Snap should fix the problem, since the change in location should get you far enough away from whatever magnetic field is causing the issue. Magnetometer problems shouldn’t take more than a minute or two of wiggling to resolve if you’re turning the unit through at least 90 degrees of rotation, taking about 2-4 seconds for each back-and-forth cycle. Also, Snap won’t recalibrate the magnetometer without the rotor set in place. So make sure you have the full unit together. Then take it outside, away from anything metal or magnetic, and try to recalibrate. |
| Recalibrate Accelerometer | 1. Connect to Snap. 2. Go into the Advanced Settings menu. 3. Select the CALIBRATE ACCELEROMETER option. 4. Then follow the on-screen instructions. |
First impressions.[/expand] [expand title=”Support and Feedback” tag = “h1”] We’re here to help if you have problems. You can reach us at support@vantagerobotics.com or call us at 510-907-7012. If you experience any issues, please record a brief description of the issue and the time. This will enable us to find the correct log for debugging the problem. We’d also love to get your feedback. Here’s what we especially want to hear
- Times you felt confused about something that didn’t work as you expected.
- Bugs! It is especially helpful if you have found a bug to give enough information to reproduce it ourselves. Please also make a note of the time and date when you see a bug so we can find it in the log files if needed.
- Ideas for features or improvements.
- What you love and what you really don’t like.
- Stories about experiences you’ve had with Snap.
- Things you wish you could do with Snap, but can’t or don’t feel comfortable doing.
Thank you for sharing your experiences!
[/expand]